
You may have heard that Camunda now provides Camunda Robotic Process Automation (RPA) for automating manual, repetitive tasks to streamline your orchestrated processes. But would you know where to begin?
This blog will provide step-by-step instructions so you can build your first Camunda RPA task and then run it.
RPA leverages software robots to automate tasks traditionally handled manually. By automating these processes, organizations can enhance efficiency and minimize human errors. These RPA tasks can be integrated into your end-to-end Camunda processes by connecting isolated bots.
Terminology
Before getting started, it is important to understand the terminology related to robotic process automation.
- Bot/Robot: A software agent that executes tasks and automates processes by interacting with applications, systems, and data.
- Robot script: The script that tells the robot what actions, such as, keystrokes and mouseclicks, to execute.
Overview of the model you will build
For this example, you’ll build a model similar to the one below.
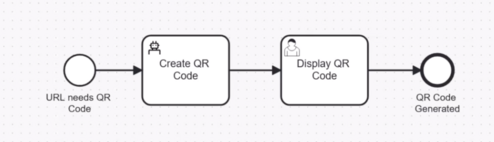
In this scenario, you’re providing the end user with the ability to generate a QR code for a website. The RPA bot will access a QR website (www.qrcode-monkey.com) to generate the QR code and bring that back to the end user.
The process starts with a form for the URL that requires a QR code. Once the URL is entered and the form is submitted, the process will use a `.robot` script that provides this URL to the website to generate the QR code. Once generated, the QR code is displayed in a form that the end user can download if desired.
What you’re going to do today is:
- Create a model in Camunda SaaS.
- Install the RPA runtime on your local machine.
- Create an RPA script on that local machine.
- Deploy the RPA script to the cloud.
- Run your process, which will launch the RPA runtime on your local machine.
Assumptions and initial configuration
If you’re using this step-by-step guide to create your first Camunda RPA bot process, let’s make sure you have a few things in order before you begin.
- In order to take advantage of the latest and greatest functionality provided by Camunda, you’ll need to have a Camunda 8.7.x cluster or higher available for use in Camunda SaaS.
- You will be using Web Modeler and Forms to create your model and human task interface.
- You’ll create your RPA script in Desktop Modeler to create your RPA script.
- You’ll deploy and execute your process in Camunda SaaS.
- You will also be running the Camunda RPA robot on your machine (RPA Worker), and you will be deploying your RPA script to the cloud so when your process runs, it will trigger the robot locally.
Required skills
It is assumed that those using this guide have the following skills with Camunda:
- Form Editor—the ability to create forms for use in a process.
- Web Modeler—the ability to create elements in BPMN and connect elements together properly, link forms, and update properties for connectors.
- Desktop Modeler—understanding of installation and use of Desktop Modeler.
- TaskList—the ability to open items and act upon them accordingly, as well as starting processes.
GitHub repository and video tutorial
If you don’t want to build this process from scratch, you can access the GitHub repository and download the individual components. We’ve also created a step-by-step video tutorial for you. The steps in this guide closely mirror the steps taken in the video tutorial.
Installations
Desktop Modeler
In order to build your RPA script, install Camunda Desktop Modeler if you don’t already have it installed.
If it is, make sure it’s the latest version to take advantage of Camunda RPA functionality within the application.
Download the appropriate version of Camunda Desktop Modeler for your machine. Make sure you’re using version 5.34.0 or higher of Desktop Modeler. Installation instructions are on the download page, but essentially you’ll unpack the archive (for Windows) or open the DMG (for macOS). Then you will start the Camunda Modeler (executable for Windows, application for macOS) when you want to run the application.
RPA worker
Download and install the RPA worker that will run your RPA script locally on your machine. You can find the RPA worker in GitHub. Select version 1.0.1 or later for this tutorial.
Scroll down to the assets and select the appropriate asset for your local machine:
- For Windows:
rpa-worker_1.0.1_win32_amd634.zip - For macOS:
rpa-worker_1.0.1_darwin_aarch64.zip
Extract the contents of the .zip file on your local machine. This creates a directory of the same root name as the .zip file, which will contain your executable for the RPA-worker and an application.properties file for configuration purposes.
Updating the properties file
Update the application.properties file with the correct information for your configuration before starting the executable for the RPA worker. You can obtain many of these settings by creating an API Client and reviewing the settings and values.
We’ll cover how to do this and what to modify in that file later in this blog.
Notes for macOS installation
You may want to install Homebrew for running the RPA worker on your local macOS machine. To do so, run the following command:
/bin/bash -c "$(curl -fsSL https://raw.githubusercontent.com/Homebrew/install/HEAD/install.sh)"Followed by:
echo >> ~/.zprofile
echo 'eval "$(/opt/homebrew/bin/brew shellenv)"' >> ~/.zprofile
eval "$(/opt/homebrew/bin/brew shellenv)"
Confirm that you’re running Python 3.11. Run this command to start the rpa-worker executable: ./rpa-worker_1.0.1_darwin_aarch64 .
Do not start the executable until requested later in this tutorial.
Building your process
Follow these steps to create your RPA bot process.
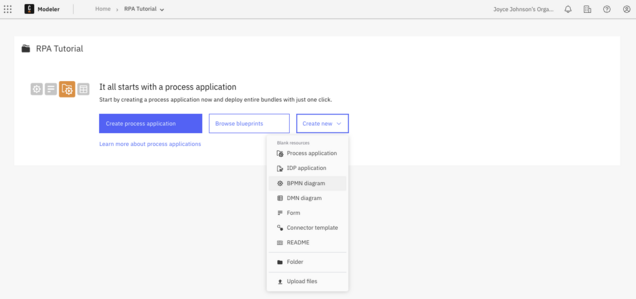
Create a new project for your process model and any other associated assets (this example uses RPA Tutorial).
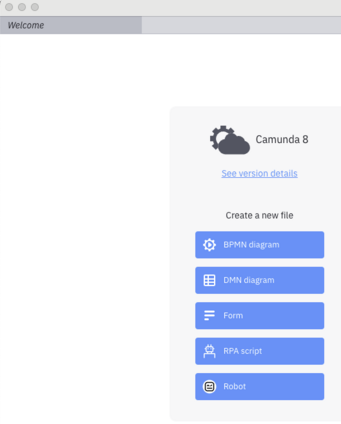
Using the drop down menu, create a new BPMN diagram.
Name your new process Get a QR Code.
Initial model
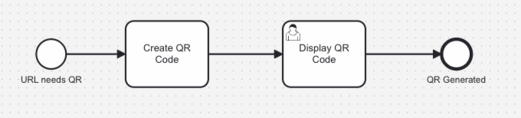
Now it’s time to build your process model in BPMN and the appropriate forms for any human tasks. You’ll be building the model represented below:

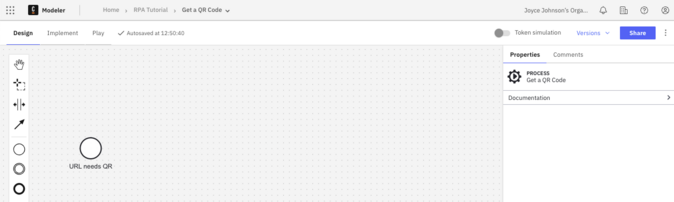
Begin by building your model in Design mode as shown below.
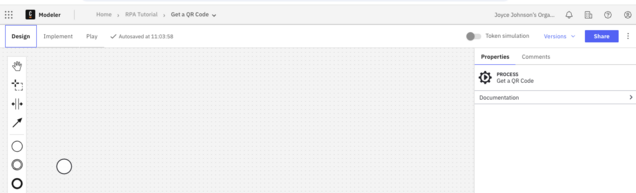
To create your initial model, name your start event. This example calls it URL needs QR.
Add an End Event and call it QR Generated.

After this task, create a task called Create QR Code. This will be the RPA Connector task to run Camunda RPA.
Then create a human task called Display QR Code. This will display the code obtained through RPA in the prior step.
Next, create a form to serve as the frontend to the process providing the URL that needs a QR generated.
Click the Start task, select to Link Form, and select Create a New Form (the blue button).
All you really need on this form is a text field to enter the URL that needs to be generated. For the text field, enter the label. The key (or variable) should be url.
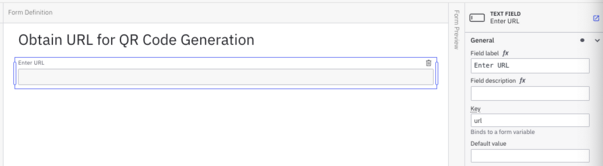
The form shown here includes a title field (Text view) in addition to the text field. This is not required.
Click Go to diagram -> to return to your diagram.
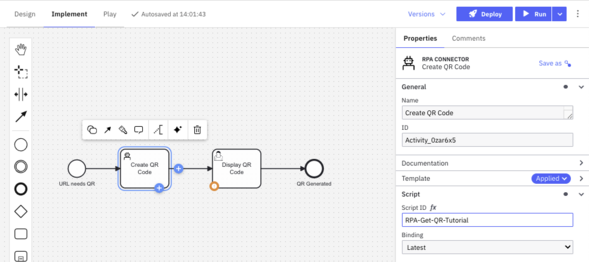
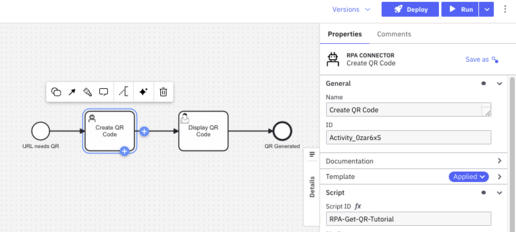
Select the first task, Create QR Code, and change the element type to RPA Connector.
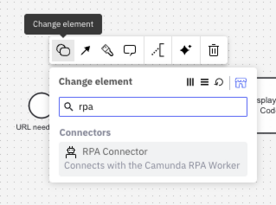
If you do not see the template, search the Camunda Marketplace from Web Modeler and download the connector to your project. If you still do not see the connector, verify (in Implement mode) that you are checking problems against Zeebe 8.7 and not a prior version.
Switch to Implement mode in the Web Modeler and select your new RPA connector element.
In the properties for this element, enter the Script ID for the connector as RPA-Get-QR-Tutorial. This will be the script you’ll create using Desktop Modeler and deploy to the cloud later.
Select your human task to display the QR Code and link a form.

Select + Create new form to enter the form editor.

You’ll receive something back from the RPA bot, so create those items in the form. The first is a document preview for the document that will be coming back.
Enter some title (this example uses QR Code Results and then lists qrcode for the document reference—more on that coming up).
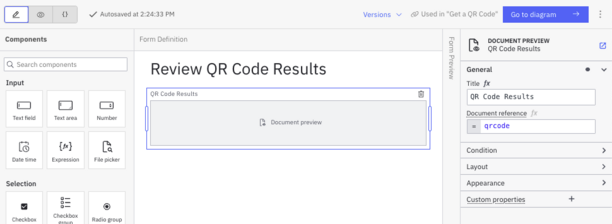
This form also creates a heading (Text view) field for the form. That is not necessary.
Click Go to diagram -> to return to your BPMN diagram.
Now that you have the initial model, let’s move on to setting up RPA and using Desktop Modeler to create the RPA script.
Create your RPA script
Now you need to create the RPA script that will tell the robot what tasks to complete, including launching the QR code website, entering the URL for the QR Code, and so on.
Launch Camunda Desktop Modeler.
Click RPA Script to generate a default script for getting started with your first RPA bot.
Connecting the RPA worker
The next step is to properly connect the RPA worker so you can execute RPA scripts properly.
When you select RPA script from the Camunda Modeler menu, you’ll see an example script that runs an RPA challenge.
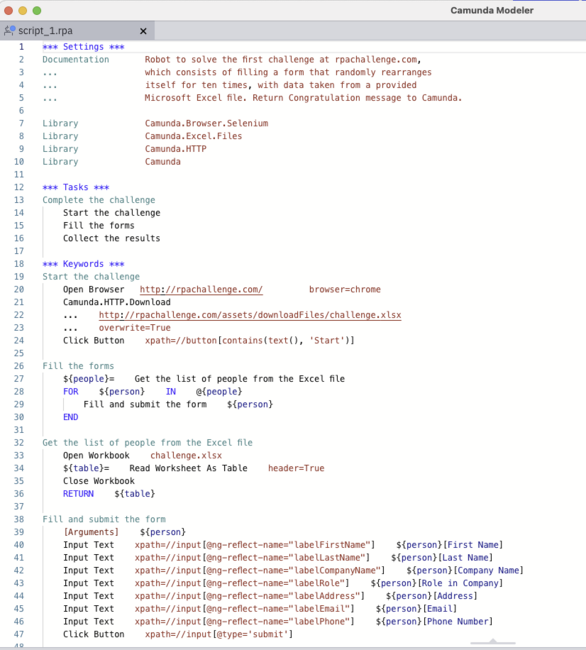
At the bottom of the screen below the RPA initial script, you’ll see a note with a red icon stating that the RPA worker is not connected. You’ll take care of that next.

This warning message indicates that scripts can be created but not executed until the worker is properly connected.
Confirm that you’ve taken the proper steps to install the RPA worker covered at the beginning of this blog.
Now open a terminal window and run the appropriate executable from your RPA worker directory. For example, ./rpa-worker_1.0.1_darwin_aarch64.
When everything is working properly, the note at the bottom of the script page reveals that the RPA worker is connected and the icon turns green.

Testing the example script
To ensure that everything is working correctly, run the script to test it.
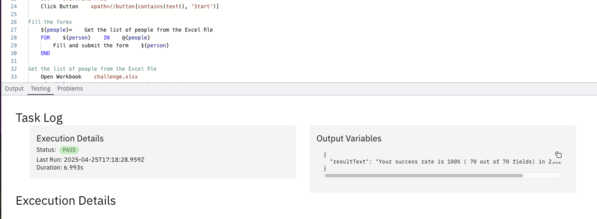
Click the Test Script icon to the immediate right of the RPA worker connected statement.

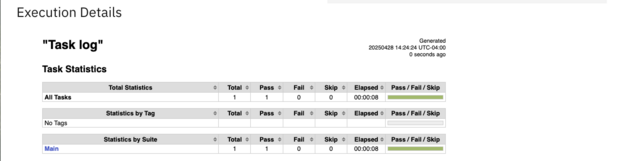
The script opens a browser, fills in fields quickly, and then completes. You can review the statistics from running the script in the testing output below your script.
You can see an example here:

The RPA script
Before you build the script, it’s important to understand what you want the script to accomplish. Let’s take a moment to review that. Essentially, you’ll be doing the following:
- Open a browser.
- Open the proper QR Code URL (https://www.qrcode-monkey.com).
- Accept any required cookies by clicking Accept All Cookies.
- Enter the URL provided in the Request a QR Code form in the proper form field on the website.
- Click Create QR Code.
- Copy the created QR code from the proper region to be presented in our final form in the process.
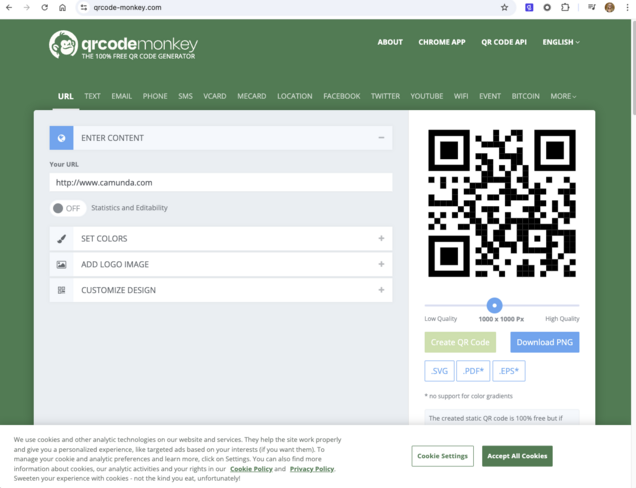
The browser screen should look something like this:
Create your script
Now that you’ve reviewed what the script needs to accomplish, go back to Camunda Modeler and remove everything under the last Library line so you can put together your script for this exercise.
You can also remove the Documentation section and remove the library for Camunda.Excel.Files, which you won’t be using.
So your starting script looks something like this:
*** Settings ***
Library             Camunda.Browser.Selenium
Library             Camunda.HTTP
Library             Camunda
Camunda RPA uses Robot Framework, an open source Python-based RPA framework that lets you describe how you can step through tasks that you want to accomplish.
Let’s create your script.
Enter your Tasks section by adding the task name:
*** Tasks ***
Get QR Code
You’ll be creating two methods under this task:
Generate QR Code
Send QR Code
Now enter your Variables section:
*** Variables ***You’ll want a single variable called url as shown here:
${url} https://www.camunda.comYour script should look something like this so far:
*** Settings ***
Library             Camunda.Browser.Selenium
Library             Camunda.HTTP
Library             Camunda


*** Tasks ***
Get QR Code
   Generate QR Code
   Send QR Code


*** Variables ***
${url}      https://www.camunda.com
Now create your Keywords section:
*** Keywords ***This is where you will define the methods.
First define your Generate QR Code method with the following lines:
Generate QR Code
	Open Available Browser	https://www.qrcode-monkey.com
	Sleep 2s
You can elect to wait for a condition in lieu of the Sleep command if you like.
You want to be able to click a button to accept the cookies. Use the Click Button method to do this:
Click Button locatorFind the location for the Accept All Cookies button in your browser.

To do this, find the locator to enter in this statement. Open your web browser and go to https://qrcode-monkey.com. While hovering over Accept All Cookies, right click, and choose Inspect.
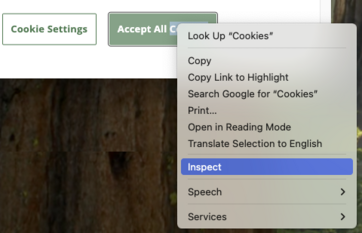
This displays the locator information for this button (onetrust-accept-btn-handler) as shown below:

Replace locator with id:onetrust-accept-btn-handler in the RPA script:
Click Button id:onetrust-accept-btn-handlerContinue to find the applicable locators for the places where you’ll enter text on the web form. The next location will be where you enter the URL for the QR code generation. That locator is qrcodeUrl, so your next line will look like this:
Input Text id:qrcodeUrl ${url}This ensures that you’re entering the variable from the form in Camunda as the text for this statement.
Next you want to be able to click a button to actually create the QR code, which will look like this:
Click Button id:button-create-qr-codeIn this case, run another Sleep so that the script doesn’t run too fast—you want to be able to see it running.
Sleep 2sNow that you have the first method, Generate QR Code, you need to create the Send QR Code section of the RPA script.
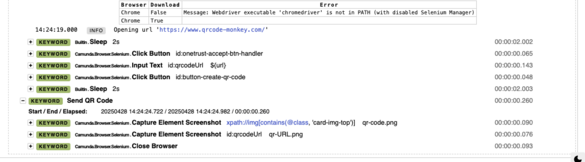
Remember to capture a screenshot of your QR code, so use the statement Capture Element Screenshot. However, in this example, you’re not going to enter the locator ID. Instead, use xpath and search for an image as shown below:
Capture Element Screenshot xpath://img[contains(@class, 'card-img-top')] qr-code.pngNext, capture the URL that you used as well for the QR code:
Capture Element Screenshot id:qrcodeUrl qr-URL.pngFinally, upload the resulting screenshots for use in your Camunda process.
Upload Documents **/*.png qrCodeYou’ll close the browser using Close Browser.
Your final script should look like the one shown below:
*** Settings ***
Library             Camunda.Browser.Selenium
Library             Camunda.HTTP
Library             Camunda


*** Tasks ***
Get QR Code
   Generate QR Code
   Send QR Code


*** Variables ***
${url}      https://www.camunda.com


*** Keywords ***


Generate QR Code
   Open Available Browser      https://www.qrcode-monkey.com/
   Sleep    2s
   Click Button    id:onetrust-accept-btn-handler
   Input Text      id:qrcodeUrl    ${url}
   Click Button    id:button-create-qr-code
   Sleep    2s


Send QR Code
   Capture Element Screenshot    xpath://img[contains(@class, 'card-img-top')]    qr-code.png
   Capture Element Screenshot    id:qrcodeUrl      qr-URL.png
   Upload Documents    **/*.png    qrCode
   Close Browser
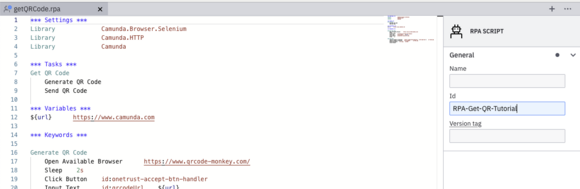
Be sure to save your script. This example saves the script as getQRCode.rpa.
Test your script locally
Now that you’ve generated your script, it’s time to test it locally before connecting it to your Camunda SaaS Zeebe engine. In order to do this, remove the Upload Documents statement until you connect your script to the Camunda engine.
To test your script, remove the Upload Documents statement.
Confirm that your RPA worker is connected (see this section to review how to do this).
When your RPA worker is connected, click the Test Script icon.
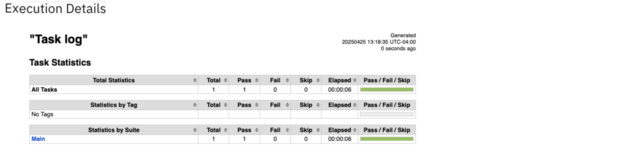
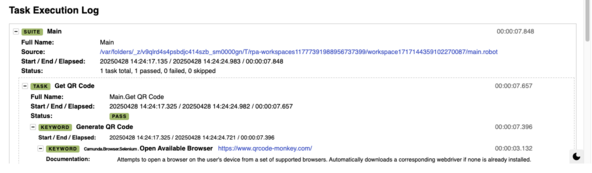
A browser should open to the QR Code website. You’ll see the various buttons clicked, the URL filled in, and the screenshots created. This will happen quickly. You should receive a PASS status as shown below:
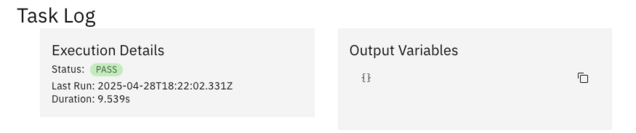
You can expand the various tasks for more detailed information on what took place in the script.
Deploying the RPA script
Now that you have a working script (be sure to add back in the Upload Documents statement), it’s time to deploy this script to your SaaS environment to make it available for use in process models.
Let’s take a little mental inventory on what you’ve done so far:
- You have a model in Camunda Web Modeler that requests a URL from a user and then calls an RPA script to obtain a QR code for that URL and pass it back to the user for view.
- You have RPA running on your local machine.
- You have an RPA Script that will obtain the QR code by completing specific tasks.
You need to take a few final steps in order to deploy your script, and that involves making sure you’re connecting your script ID. Begin by making the IDs match on your cloud model and your RPA script.
Open your cloud model and select the Create QR Code task. Review the properties to find the Script ID and copy it.
You can see here the ID for this example is RPA-Get-QR-Tutorial.
Go back to Desktop Modeler. If it’s not already viewable, expand the properties in your Desktop Modeler while displaying the script.
Paste the RPA-Get-QR-Tutorial into the ID location for your script in Camunda Desktop Modeler.
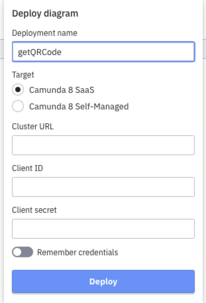
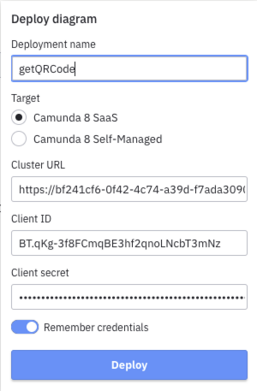
To deploy your script, locate the Deploy icon at the bottom of your Desktop Modeler screen (the rocket ship). You’ll be prompted to enter some information for this deployment.
For your deployment, create a Desktop Modeler Client API in your SaaS Console and then obtain the remaining elements required for this dialog at that time. First, open Console in your SaaS environment and select the appropriate cluster.
Click the API tab and then click Create new client.
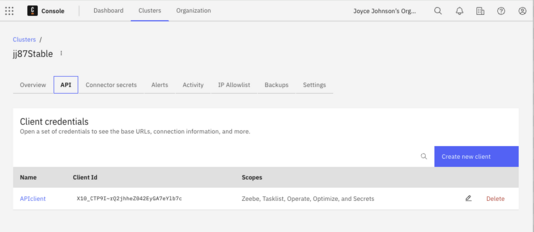
Enter the name DesktopModeler for the API name and select Zeebe for the required credentials.

Click Create to create the credentials required. This displays the required items to fill into the dialog box in Desktop Modeler.
Before closing this dialog, be sure to click the Desktop Modeler tab to find the Cluster URL that you need.
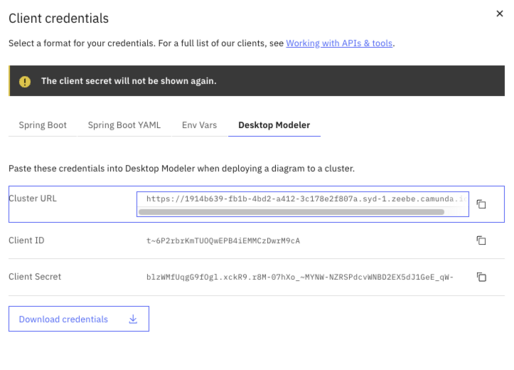
Enter the Cluster URL, the Client ID, and the Client Secret, and then click Deploy.
You should receive verification that the script was properly deployed.
Connecting your RPA worker to the cloud
Just to clarify where you are again, the call to use the script is being orchestrated in the cloud, but it’s being run locally on your machine. Now you need to take the final steps to make sure everything is communicating properly in order to execute your RPA script.
Your next step is to connect your local RPA worker to the cloud engine.
Update your application.properties file in the RPA worker directory to the proper values for the following:
camunda.client.cluster-idcamunda.client.regioncamunda.client.auth.client-idcamunda.client.auth.client-secret
To obtain these values, open your SaaS Console and create another API client. Select both Zeebe and Secrets scopes.
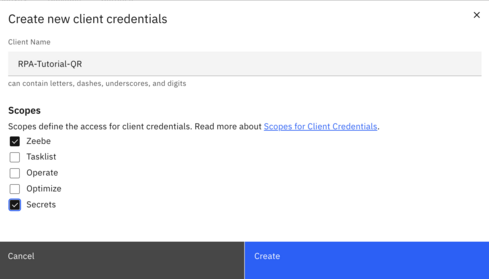
This example uses RPA-Tutorial-QR for this new client.
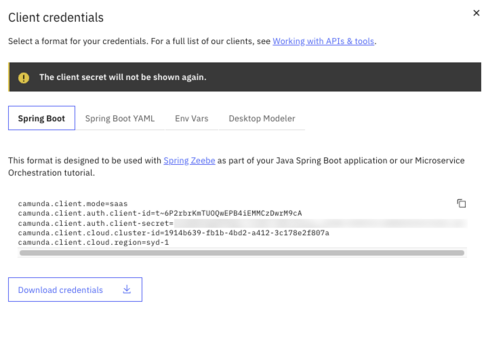
You can choose to download the credentials or copy/paste them into your application.properties file. Your file will look something like this:
## Camunda RPA Worker

## Full properties reference: https://github.com/camunda/rpa-worker?tab=readme-ov-file#configuration-reference

### General Configuration

#camunda.rpa.zeebe.worker-tags=default

#camunda.rpa.robot.default-timeout=PT5M

#camunda.rpa.robot.fail-fast=true

#camunda.rpa.python.extra-requirements=/path/to/extra-requirements.txt

### Zeebe Configuration

#### SaaS Production

camunda.client.mode=saas

camunda.client.auth.client-id=Sd6QUXtleuLio0Luk5wsPGM~RvyqDw~i

camunda.client.auth.client-secret=<SECRET HERE>

camunda.client.cloud.cluster-id=3c43f328-25bb-49c0-bd3f-7786af3b98c0

camunda.client.cloud.region=hel-1
Once you’ve updated your information, restart your RPA worker. It should read the new application.properties files that point to the proper configuration in SaaS.
Run your script
You’re almost there! Now it’s time to test your original BPMN diagram to make sure that everything is working correctly.
Go back to your Web Modeler and deploy your diagram to the proper cluster that you used to create your API clients.

Go to Tasklist, click the Processes tab, and start the process Get a QR Code.
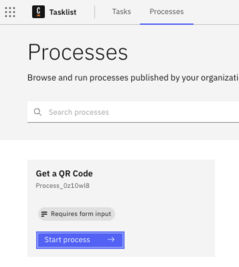
You will be prompted to enter the URL for the QR Code in the form you created. Enter any URL you want to use here.

Click Start process.
You should see the browser open on your local machine. The URL will be entered, the screenshots generated, and then you’ll see another task appear in Tasklist (be sure to click on the Tasks tab in Tasklist).
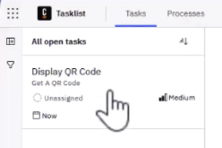
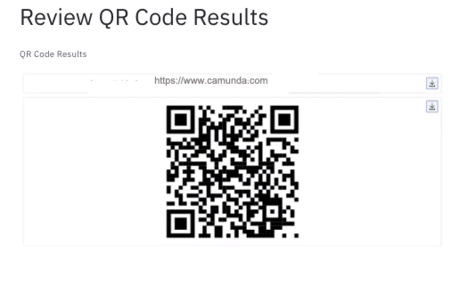
When you open this task, you’ll see the generated QR code and the URL that was used in the first form in the form.
Congratulations
You’ve completed your first RPA script! You’ve also deployed it, created a process model, and executed your Camunda RPA script in the process. We hope you enjoyed this step-by-step tutorial.
Be sure to check out the video to use to walk through the process.
Start the discussion at forum.camunda.io