
The RPA Challenge is a popular benchmark in the automation community, designed to test how well bots can handle dynamic web forms. The task involves filling out a form that changes its layout with each submission, using data from an Excel file. While this might seem tricky, Camunda’s RPA capabilities make it surprisingly straightforward.
In this post, we’ll walk through what RPA is, how to tackle the RPA Challenge using Camunda’s tools, from scripting the bot to deploying and executing it within a BPMN workflow, and finally how process orchestration can help super-charge your RPA bots.
What is RPA, and why should you care?
Robotic Process Automation (RPA) is a technology that allows you to automate repetitive, rule-based tasks typically performed by humans. Think of actions like copying data between systems, filling out web forms, or processing invoices—if it follows a predictable pattern, RPA can probably handle it. The goal is to free up people from mundane work so they can focus on higher-value tasks that require creativity, problem-solving, or empathy.
At the heart of RPA is the RPA bot, a small script that mimics human actions on a computer. These bots can click buttons, read emails, move files, enter data, and more. They’re like digital assistants that never sleep, don’t make typos, and follow instructions exactly as given. And unlike traditional software scripts, RPA bots are often designed to work with existing user interfaces, so you don’t need to rebuild backend systems to automate work.
If you already use process orchestration, why use RPA at all? Because it’s a fast, cost-effective way to automate existing business processes without major changes to your IT infrastructure. Whether you’re streamlining internal workflows or integrating legacy systems with modern platforms like Camunda, RPA gives you the power to get more done, faster—and with fewer errors. When combined with process orchestration, it becomes even more powerful, allowing bots to operate as part of larger, end-to-end business processes.
Follow along with the video
We’re going to dig into the RPA Challenge with a full tutorial below, but feel free to follow along with the video as well.
Understanding the RPA script
To solve the RPA Challenge, we used a script written in Robot Framework, a generic open-source automation framework. The script is built with Camunda’s RPA components, allowing seamless orchestration within a BPMN process. You can view the full script, as well as a BPMN model that uses the script, by clicking here. In this section, we’ll walk through the script in detail.
Settings
*** Settings ***
Documentation       Robot to solve the first challenge at rpachallenge.com,
...                 which consists of filling a form that randomly rearranges
...                 itself for ten times, with data taken from a provided
...                 Microsoft Excel file. Return Congratulation message to Camunda.
Library             Camunda.Browser.Selenium    auto_close=${False}
Library             Camunda.Excel.Files
Library             Camunda.HTTP
Library             Camunda
The Settings section defines metadata and dependencies for the script:
- Documentation: A human-readable description of what the robot does. In this case, it describes the task of filling a dynamically rearranging form using Excel data.
- Library: These lines load external libraries required for the script to run. Robot Framework supports many built-in and third-party libraries. When using Camunda’s implementation, you can also use Camunda-specific RPA libraries tailored to browser automation, Excel file handling, HTTP actions, and integration with the Camunda platform.
When writing a RPA script, you can import as many libraries as needed to accomplish the task at hand. Here’s what each library used in this challenge does:
- Camunda.Browser.Selenium: Enables browser automation via Selenium. The
auto_close=${False}argument ensures the browser doesn’t automatically close after execution, useful for debugging. - Camunda.Excel.Files: Provides utilities to read data from Excel files, which is essential for this challenge.
- Camunda.HTTP: Used to download the Excel file from the RPA Challenge site.
- Camunda: Core Camunda RPA library that helps interact with the platform, such as setting output variables for process orchestration.
Tasks
*** Tasks ***
Complete the challenge
    Start the challenge
    Fill the forms
    Collect the results
The Tasks section defines high-level actions that the robot will execute. In Robot Framework, a “task” is essentially a named sequence of keyword calls and defines every action the robot will take.
Each task is given a friendly name (for this challenge, the task is named “Complete the challenge”). This task is composed of three keyword invocations:
- Start the challenge: Opens the site and prepares the environment.
- Fill the forms: Loops through the Excel data and fills out the form.
- Collect the results: Captures the output message after the form submissions are complete.
Each of these steps corresponds to a custom keyword defined in the next section.
Keywords
The Keywords section is where we define reusable building blocks of the automation script. Keywords are like functions or procedures. Each keyword performs a specific operation, and you can call them from tasks or other keywords. The order keywords are defined does not matter, as they are executed individually as defined in the task.
Let’s break down each one.
Start the challenge
Start the challenge
    Open Browser   http://rpachallenge.com/         browser=chrome
    Maximize Browser Window
    Camunda.HTTP.Download
    ...    http://rpachallenge.com/assets/downloadFiles/challenge.xlsx
    ...    overwrite=True
    Click Button    xpath=//button[contains(text(), 'Start')]
This keyword sets up the browser environment and downloads the data file required for the challenge. It begins by launching a Chrome browser using the Open Browser keyword, which is part of the Camunda.Browser.Selenium library imported earlier, and navigates to rpachallenge.com. Once the site loads, the Maximize Browser Window keyword ensures that all elements on the page are fully visible and accessible for automation.
The script then uses the Camunda.HTTP.Download keyword from the Camunda.HTTP library to download the Excel file containing the challenge data; the overwrite=True argument ensures that an up-to-date version of the file is used each time the bot runs. Finally, it clicks the “Start” button on the page using the Click Button keyword, targeting the element via an XPath expression that identifies the button by its text. This action triggers the start of the challenge and reveals the form to be filled.
This keyword sets the stage for the main task by ensuring we’re on the correct page and have the necessary data.
Fill the forms
Fill the forms
    ${people}=    Get the list of people from the Excel file
    FOR    ${person}    IN    @{people}
        Fill and submit the form    ${person}
    END
This keyword performs the core automation logic by iterating over the data and filling out the form multiple times. It starts by calling the custom keyword Get the list of people from the Excel file, which reads the downloaded Excel file and returns its contents as a table—each row representing a different person.
The script then enters a loop using Robot Framework’s FOR ... IN ... END syntax, iterating through each person in the dataset. Within this loop, it calls the Fill and submit the form keyword, passing in the current person’s data. This step ensures that the form is filled and submitted once for every individual listed in the Excel file, effectively completing all ten iterations of the challenge.
The keyword demonstrates how modular and readable Robot Framework scripts can be. Each action is broken into self-contained logic blocks, which keeps the code clean and reusable.
Get the list of people from the Excel file
Get the list of people from the Excel file
    Open Workbook    challenge.xlsx
    ${table}=    Read Worksheet As Table    header=True
    Close Workbook
    RETURN    ${table}
This keyword is responsible for reading and parsing the data from the Excel file. It begins by using the Open Workbook keyword to open the downloaded challenge.xlsx file. Once the file is open, the Read Worksheet As Table keyword reads the contents of the worksheet and stores it as a table, with the header=True argument ensuring that the first row is treated as column headers—making the data easier to work with.
After reading the data, the Close Workbook keyword is called to properly close the file, which is a best practice to avoid file access issues. Finally, the keyword returns the parsed table using RETURN ${table}, allowing the calling keyword to loop through each row in the dataset.
The result is a list of dictionaries, where each dictionary represents a person’s data (e.g., first name, last name, email, etc.).
Fill and submit the form
Fill and submit the form
    [Arguments]    ${person}
    Input Text    xpath=//input[@ng-reflect-name="labelFirstName"]    ${person}[First Name]
    Input Text    xpath=//input[@ng-reflect-name="labelLastName"]    ${person}[Last Name]
    Input Text    xpath=//input[@ng-reflect-name="labelCompanyName"]    ${person}[Company Name]
    Input Text    xpath=//input[@ng-reflect-name="labelRole"]    ${person}[Role in Company]
    Input Text    xpath=//input[@ng-reflect-name="labelAddress"]    ${person}[Address]
    Input Text    xpath=//input[@ng-reflect-name="labelEmail"]    ${person}[Email]
    Input Text    xpath=//input[@ng-reflect-name="labelPhone"]    ${person}[Phone Number]
    Click Button    xpath=//input[@type='submit']
This keyword fills out the web form using data for a single person. It begins with the [Arguments] ${person} declaration, which accepts a dictionary containing one individual’s details—such as name, email, and company information—retrieved from the Excel file. The form fields are then populated using multiple Input Text keywords, each one targeting a specific input element on the page. These fields are identified using XPath expressions that match the ng-reflect-name attributes, ensuring the correct data is entered in the right place regardless of how the form rearranges itself. Once all fields are filled in, the Click Button keyword is used to submit the form, completing one iteration of the challenge.
The challenge dynamically rearranges form fields on each iteration, but these attributes remain consistent, making them a reliable way to target inputs.
Collect the results
Collect the results
    ${resultText}=    Get Text    xpath=//div[contains(@class, 'congratulations')]//div[contains(@class, 'message2')]
    Set Output Variable    resultText    ${resultText}
    Close Browser
After all the forms have been submitted, this keyword captures the final confirmation message displayed by the RPA Challenge. It starts by using the Get Text keyword to extract the congratulatory message shown on the screen, targeting the message element with an XPath expression that identifies the relevant section of the page.
The retrieved message is then passed to Camunda using the Set Output Variable keyword, which makes the result available to the surrounding BPMN process—allowing downstream tasks or process participants to use or display the outcome. Finally, the Close Browser keyword is called to shut down the browser window and clean up the automation environment.
Testing, deploying and executing with Camunda
Once your RPA script is ready, the next step is to test and integrate it into a Camunda workflow so it can be executed as part of a larger business process. To begin, you’ll need to download and install Camunda Modeler, a desktop application used to create BPMN diagrams and manage automation assets like RPA scripts. (Note: RPA scripts cannot be edited in Web Modeler currently; this feature is in development.) Desktop Modeler includes an RPA Script Editor, which allows you to open, write, test, and deploy Robot Framework scripts directly from within the application.
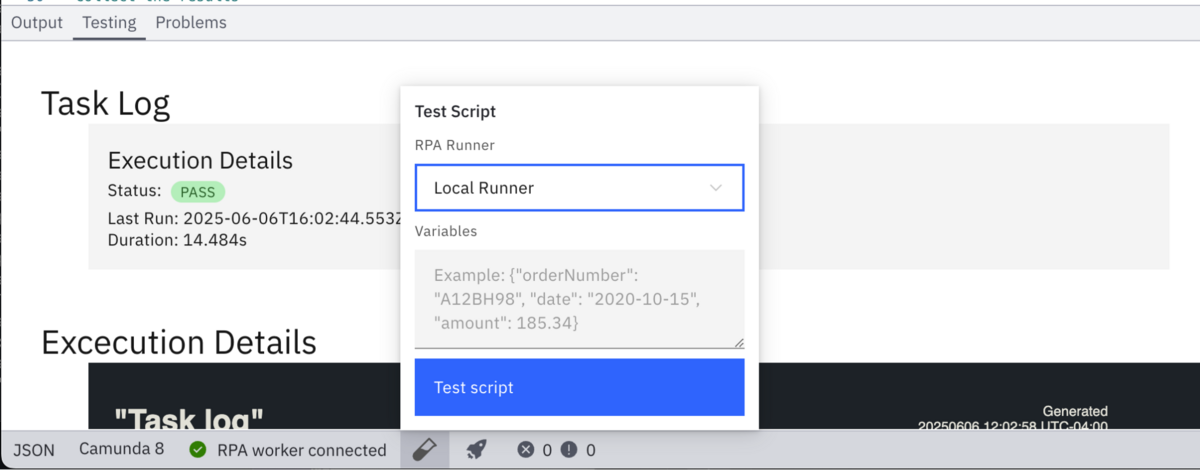
Before deploying the script to Camunda, it’s a good idea to test it locally. Start by launching a local RPA worker—a component that polls for and executes RPA jobs. You can find setup instructions for the worker in Camunda’s Getting Started with RPA guide. Once your worker is running, use the RPA Script Editor in Camunda Modeler to open your script and run it. This will launch the browser, execute your automation logic, and allow you to verify that the bot behaves as expected and completes the RPA Challenge successfully.
After confirming the script works, you can deploy it to your Camunda 8 cluster. Ensure that you have set an “ID” for the RPA script; this ID is how your BPMN process will reference and invoke the script. In the Modeler, click the “Deploy” button in the RPA Script Editor and choose the target cluster.
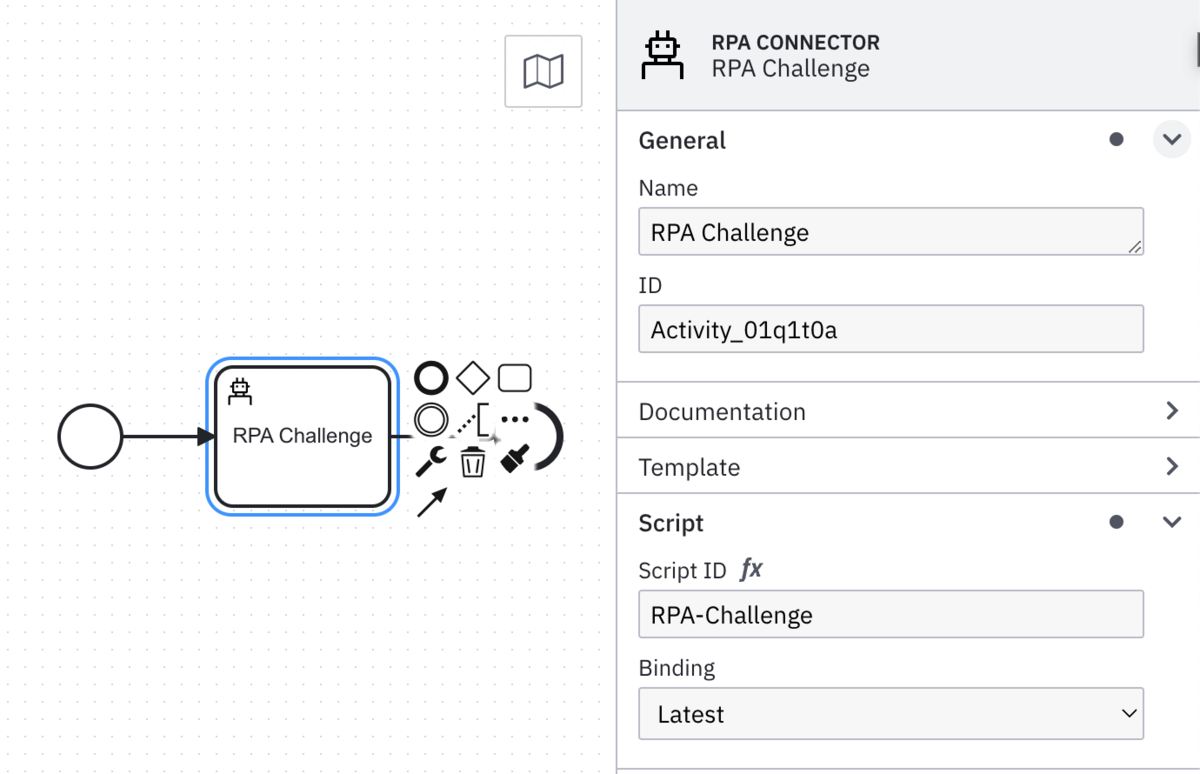
Next, create a new BPMN model in the Camunda Modeler to orchestrate the RPA bot. Start with a simple diagram that includes a Start Event, a Task, and an End Event. Select the Task and change it to the “RPA Connector”. Then, in the input parameters for the task, set the “Script ID” parameter to the ID you set in the RPA script earlier.
Once your BPMN model is ready, deploy it to the same Camunda cluster. To execute the process, you can either use the Camunda Console’s UI to start a new process instance or call the REST API. The RPA Worker will pick up the job, run the associated script, and return any output variables—like the final confirmation message from the RPA Challenge—back to Camunda. You can monitor the execution and troubleshoot any issues in Camunda Operate, which provides visibility into your running and completed processes, including logs and variable values.
With that, your RPA script is fully integrated into a Camunda process. You now have a bot that not only completes the challenge but does so as part of a well-orchestrated, transparent, and scalable business workflow.
How Camunda supercharges your RPA bots
RPA is great at automating individual tasks—but what happens when you need to coordinate multiple bots, connect them with human workflows, or make them part of a larger business process? That’s where Camunda comes in.
Camunda is a process orchestration platform that helps you model, automate, and monitor complex business processes from end to end. Think of it as the brain that tells your RPA bots when to run, what data to use, and how they fit into the bigger picture. With Camunda, your bots are no longer isolated automation islands—they become integrated, managed components of scalable workflows.
For example, you might use a Camunda BPMN diagram to define a process where:
- A customer submits a request (via a form or API),
- An RPA bot retrieves data from a legacy system,
- A human reviews the output,
- Another bot sends the results via email.
Camunda handles all of this orchestration—making sure each task runs in the right order, managing exceptions, tracking progress, and providing visibility through tools like Camunda Operate. And because Camunda is standards-based (using BPMN), you get a clear, visual representation of your processes that both developers and business stakeholders can understand.
When you combine RPA with Camunda, you’re not just automating tasks—you’re transforming how your organization runs processes. You get flexibility, scalability, and transparency, all while reducing manual effort and human error. Whether you’re scaling up existing bots or orchestrating new workflows from scratch, Camunda makes your RPA investments go further.
Conclusion
Automating the RPA Challenge with Camunda showcases our ability to handle dynamic, UI-based tasks seamlessly. By combining Robot Framework scripting with Camunda’s orchestration capabilities, you can build robust automation workflows that integrate both modern and legacy systems.
Ready to take your automation to the next level? Explore Camunda’s RPA features and see how they can streamline your business processes. Be sure to check out our blog post on how to Build Your First Camunda RPA Task as well.
Start the discussion at forum.camunda.io