
Camunda is pleased to announce new features and functionality related to how we offer agentic AI. With this post, we provide detailed step-by-step instructions to use Camunda’s AI Agent to take advantage of agentic orchestration with Camunda.
Note: Camunda also offers an agentic AI blueprint on our marketplace.
Camunda approach to AI agents
Camunda has taken a systemic, future-ready approach for agentic AI by building on the proven foundation of BPMN. At the core of this approach is our use of the BPMN ad-hoc sub-process construct, which allows for tasks to be executed in any order, skipped, or repeated—all determined dynamically at runtime based on the context of the process instance.
This pattern is instrumental in introducing dynamic (non-deterministic) behavior into otherwise deterministic process models. Within Camunda, the ad-hoc sub-process becomes the agent’s decision workspace—a flexible execution container where large language models (LLMs) can assess available actions and determine the most appropriate next steps in real time.
We’ve extended this capability with the introduction of the AI Agent Outbound connector (example blueprint of usage) and the Embeddings Vector Database connector (example blueprint of usage). Together, they enable full-spectrum agentic orchestration, where workflows seamlessly combine deterministic flow control with dynamic, AI-driven decision-making. This dual capability supports both high-volume straight-through processing (STP) and adaptive case management, empowering agents to plan, reason, and collaborate in complex environments. With Camunda’s approach, the AI agents can add additional context for handling exceptions from STP.
This represents our next phase of AI Agent support and we intend to continue adding richer features and capabilities.
Camunda support for agentic AI
To power next-generation automation, Camunda embraces structured orchestration patterns. Camunda’s approach ensures your AI orchestration remains adaptive, goal-oriented, and seamlessly interoperable across complex, distributed systems.
As part of this evolution, Camunda has integrated Retrieval-Augmented Generation (RAG) into its orchestration fabric. RAG enables agents to retrieve relevant external knowledge—such as historical case data or domain-specific content—and use that context to generate more informed and accurate decisions. This is operationalized through durable, event-driven workflows that coordinate retrieval, reasoning, and human collaboration at scale.
Camunda supports this with our new Embeddings Vector Database Outbound connector—a modular component that integrates RAG with long-term memory systems. This connector supports a variety of vector databases, including both Amazon Managed OpenSearch (used in this exercise) and Elasticsearch.
With this setup, agents can inject knowledge into their decision-making loops by retrieving semantically relevant data at runtime. This same mechanism can also be used to update and evolve the knowledge base, enabling self-learning behaviors through continuous feedback.
To complete the agentic stack, Camunda also offers the AI Agent Outbound connector. This connector interfaces with a broad ecosystem of large language models (LLMs) like OpenAI and Anthropic, equipping agents with reasoning capabilities that allow them to autonomously select and execute ad-hoc sub-processes. These agents evaluate the current process context, determine which tasks are most relevant, and act accordingly—all within the governed boundaries of a BPMN-modeled orchestration.
How this applies to our exercise
Before we step through an exercise, let’s review a quick explanation about how these new components and Camunda’s approach will be used in this example and in your agentic AI orchestration.
The first key component is the AI Task Agent. It is the brains behind the operations. You give this agent a goal, instructions, limits and its chain of thought so it can make decisions on how to accomplish the set goal.
The second component is the ad-hoc sub-process. This encompasses the various tools and tasks that can be performed to accomplish the goal.
A prompt is provided to the AI Agent and it decides which tools should be run to accomplish this goal. The agent reevaluates the goal and the information from the ad-hoc sub-process and determines which of these tools, if any, are needed again to accomplish the goal; otherwise, the process ends.
Now armed with this information, we can get into our example and what you are going to build today.
Example overview
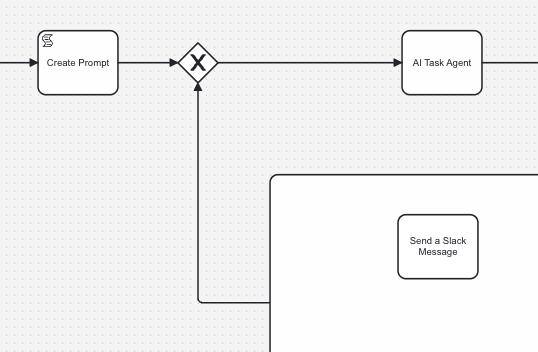
This BPMN process defines a message delivery service for the Hawk Emporium where AI-powered task agents make real-time decisions to interpret customer requests and select the optimal communication channels for message delivery.
Our example model for this process is the Message Delivery Service as shown below.
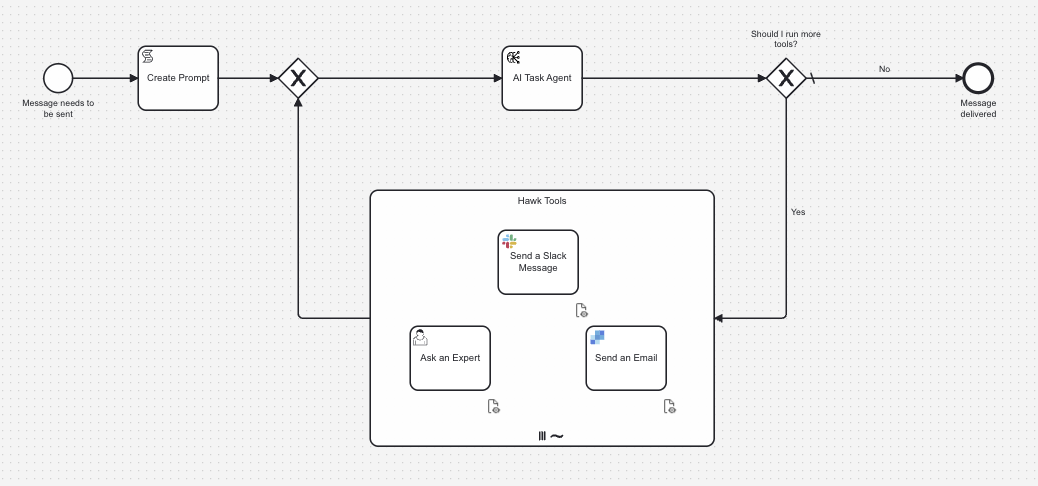
The process begins with user input filling out a form including a message, the desired individual(s) to send it to, and the sender. Based on this input, a script task generates a prompt to send to the AI Task Agent. The AI Task processes the generated prompt and determines appropriate tasks to execute. Based on the AI Agent’s decision, the process either ends or continues to refine using various tools until the message is delivered.
The tasks that can be performed are located in the ah-hoc sub-process and are:
- Send a Slack message (Send Slack Message) to specific Slack channels,
- Send an email message (Send an Email) using SendGrid,
- Request additional information (Ask an Expert) with a User Task and corresponding form.
If the AI Task Agent has all the information it needs to generate, send and deliver the message, it will execute the appropriate message via the correct tool for the request. If the AI Agent determines it needs additional information; such as a missing email address or the tone of the message, the agent will send the process instance to a human for that information.
The process completes when no further action is required.
Process breakdown
Let’s take a little deeper dive on the components of the BPMN process before jumping in to build and execute it.
AI Task Agent
The AI Task Agent for this exercise uses AWS Bedrock’s Claude 3 Sonnet model for processing requests. The agent makes decisions on which tools to use based on the context. You can alternatively use Anthropic or OpenAI.
SendGrid
For the email message task, you will be sending email as community@camunda.com. Please note that if you use your own SendGrid account, this email source may change to the email address for that particular account.
Slack
For the Slack message task, you will need to create the following channels in your Slack organization:
- #good-news
- #bad-news
- #other-news
Assumptions, prerequisites, and initial configuration
A few assumptions are made for those who will be using this step-by-step guide to implement your first an agentic AI process with Camunda’s new agentic AI features. These are outlined in this section.
The proper environment
In order to take advantage of the latest and greatest functionality provided by Camunda, you will need to have a Camunda 8.8-alpha4 cluster or higher available for use. You will be using Web Modeler and Forms to create your model and human task interface, and then Tasklist when executing the process.
Required skills
It is assumed that those using this guide have the following skills with Camunda:
- Form Editor – the ability to create forms for use in a process.
- Web Modeler – the ability to create elements in BPMN and connect elements together properly, link forms, and update properties for connectors.
- Tasklist – the ability to open items and act upon them accordingly as well as starting processes.
- Operate – the ability to monitor processes in flight and review variables, paths and loops taken by the process instance.
Video tutorial
Accompanying this guide, we have created a step-by-step video tutorial for you. The steps provided in this guide closely mirror the steps taken in the video tutorial. We have also provided a GitHub repository with the assets used in this exercise.
Connector keys and secrets
If you do not have existing accounts for the connectors that will be used, you can create them.
You will need to have an AWS with the proper credentials for AWS Bedrock. If you do not have this, you can follow the instructions on the AWS site to accomplish this and obtain the required keys:
- AWS Region
- AWS Access key
- AWS Secret key
You will also need a SendGrid account and a Slack organization. You will need to obtain an API key for each service which will be used in the Camunda Console to create your secrets.
The secrets will be referenced in your model using {{secrets.yourSecretHere}} where yourSecretHere represents the name of your connector secret.
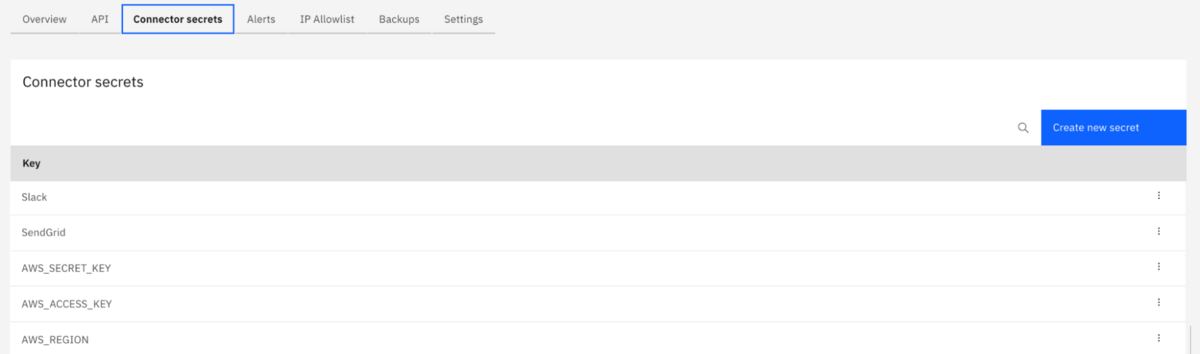
For this example to work you’ll need to create secrets with the following names if you use our example and follow the screenshots provided:
- SendGrid
- Slack
- AWS_SECRET_KEY
- AWS_ACCESS_KEY
- AWS_REGION
Separating sensitive information from the process model is a best practice. Since we will be using a few connectors in this model, you will need to create the appropriate connector secrets within your cluster. You can follow the instructions provided in our documentation to learn about how to create secrets within your cluster.
Now that you have all the background, let’s jump right in and build the process.
Note: Don’t forget you can download the model and assets from the GitHub repository.
Overview of the step-by-step guide
For this exercise, we will take the following steps:
- Create the initial high-level process in design mode.
- Create the ad-hoc sub-process of AI Task Agent elements.
- Implement the process.
- Configure the connectors.
- Configure the AI Agent connector.
- Configure the Slack connector.
- Create the starting form.
- Configure the AI Task Agent.
- Update the gateways for routing.
- Configure the ad-hoc sub-process.
- Connect the ad-hoc sub-process and the AI Task agent
- Configure the connectors.
- Deploy and run the process.
- Enhance the process, deploy and run again.
Build your initial process
Create your process application
The first step is to create a process application for your process model and any other associated assets. Create a new project using the blue button at the top right of your Modeler environment.

Enter the name for your project. In this case we have used the name “AI Task Agent Tutorial” as shown below.

Next, create your process application using the blue button provided.
Enter the name of your process application, in this example “AI Task Agent Tutorial,” select the Camunda 8.8-alpha4 (or greater) cluster that you will be using for your project, and select Create to create the application within this project.
Initial model
The next step is to build your process model in BPMN and the appropriate forms for any human tasks. We will be building the model represented below.
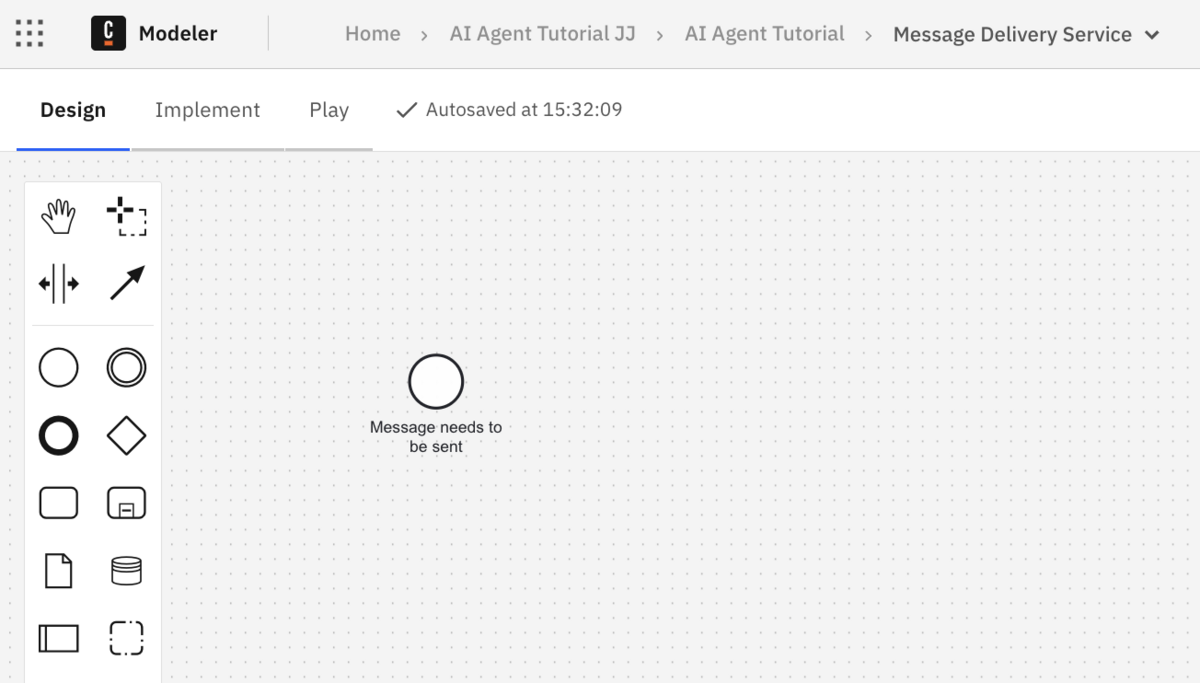
Click on the process “AI Agent Tutorial” to open to diagram the process. First, change the name of your process to “Message Delivery Service” and then switch to Design mode as shown below.

These steps will help you create your initial model.
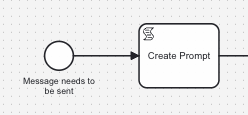
- Name your start event. We have called it “Message needs to be sent” as shown below. This start event will have a form front-end that we will build a bit later.
- Add an end event and call it “Message delivered”

- The step following the start event will be a script task called “Create Prompt.” This task will be used to hold the prompt for the AI Task Agent.
- Now we want to create the AI Task Agent. We will build out this step later after building our process diagram.

Create the ad-hoc sub-process
Now we are at the point in our process where we want to create the ad-hoc sub-process that will hold our toolbox for the AI Task Agent to use to achieve the goal.
- Drag and drop the proper element from the palette for an expanded subprocess.
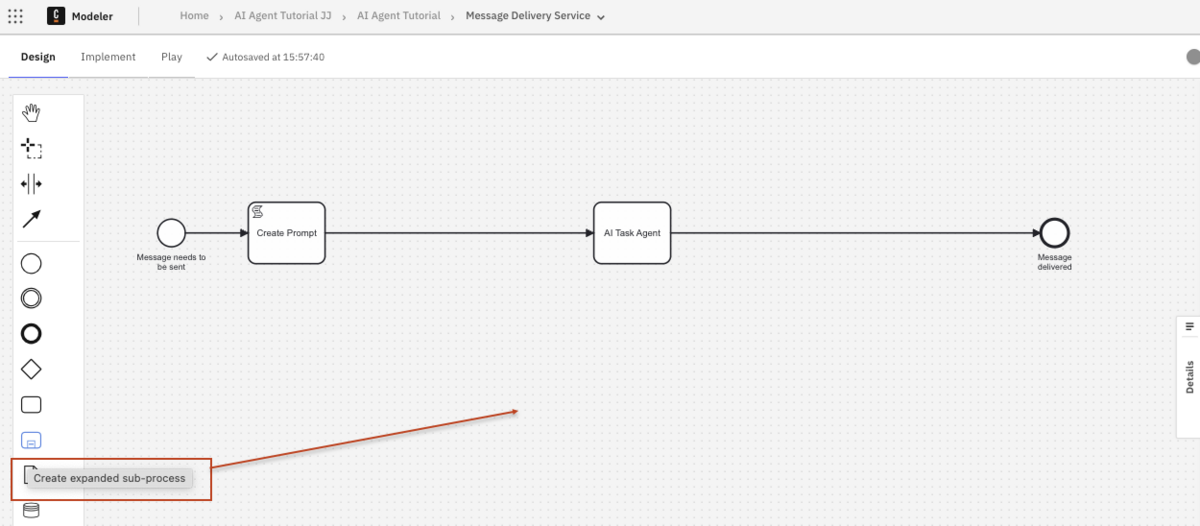
Your process will now look something like this.
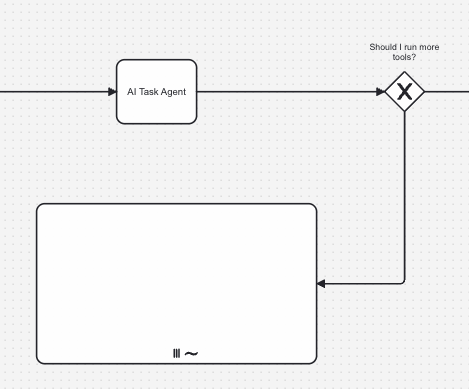
- Now this is a standard sub-process, which we can see because it has a start event. We need to remove the start event and then change the element to an “Ad-hoc sub-process.”
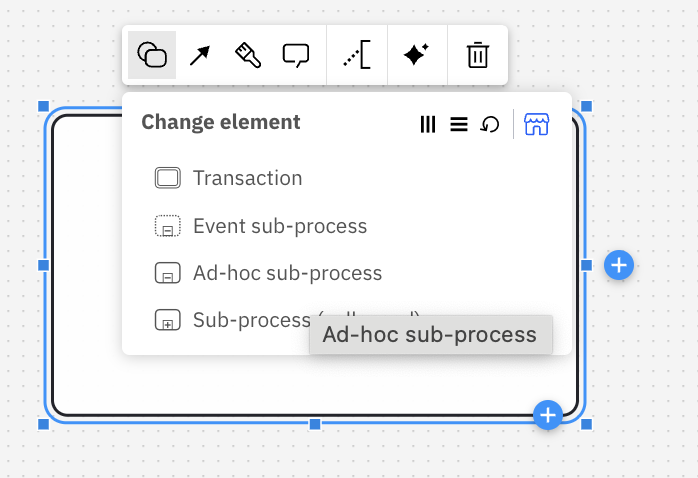
Once the type of sub-process is changed, you will see the BPMN symbol (~) in the subprocess denoting it is an ad-hoc sub-process. - Now you want to change this to a “Parallel multi-instance” so the elements in the sub-process can be run more than once, if required.
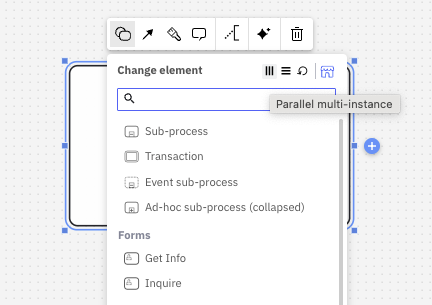
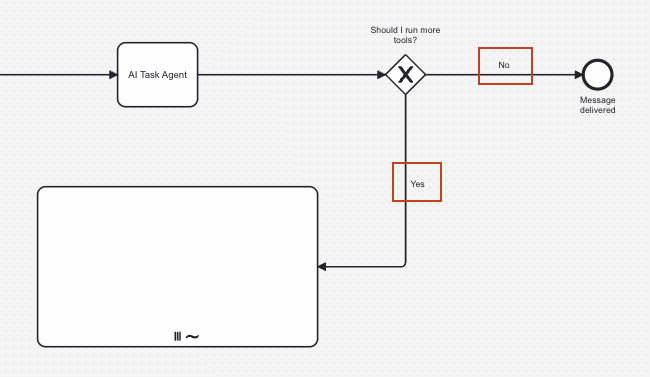
This is the key to our process, as the ad-hoc sub-process will contain a set of tools that may or may not be activated to accomplish the goal. Although BPMN is usually very strict about what gets activated, this construct allows us to control what gets triggered by what is passed to the sub-process. - We need to make a decision after the AI Task Agent executes which will properly route the process instance back through the toolbox, if required. So, add a mutually exclusive gateway between the AI Task Agent and the end event, as shown below, and call it “Should I run more tools?”.
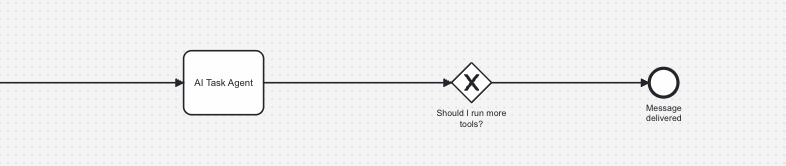
- Now connect that task to the right hand side of your ad-hoc sub-process.
- If no further tools are required, we want to end this process. If there are, we want to go back to the ad-hoc sub-process. Label the route to the end event as “No” and the route to the sub-process as “Yes” to route appropriately.
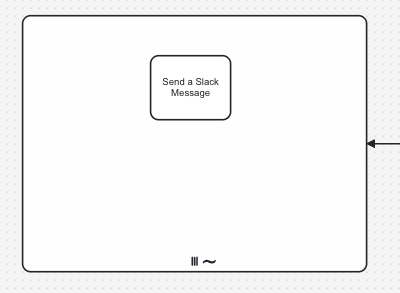
- Take a little time to expand the physical size of the sub-process as we will be adding elements into it.
- We are going to start by just adding a single task for sending a Slack message.
- Now we need to create the gateway to loop back to the AI Task Agent to evaluate if the goal has been accomplished. Add a mutually exclusive gateway after the “Create Prompt” task with an exit route from the ad-hoc sub-process to the gateway.
Implement your initial process
We will now move into setting up the details for each construct to implement the model, so switch to the Implement tag in your Web Modeler.
Configure remaining tasks
The next thing you want to do in implementation mode is to use the correct task types for the constructs that are currently using a blank task type.
AI Agent connector
First we will update the AI Task Agent to use the proper connector.
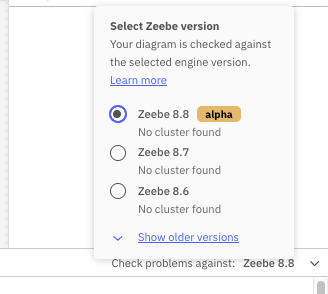
- Confirm that you are using the proper cluster version. You can do this on the lower right-hand side of Web Modeler and be sure to select a cluster that is at least 8.8 alpha4 or higher.
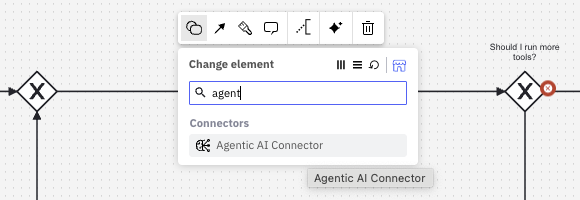
- Now select the AI Task Agent and choose to change the element to “Agentic AI Connector” as shown below.
This will change the icon on your task agent to look like the one below.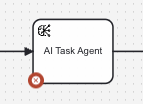
Slack connector
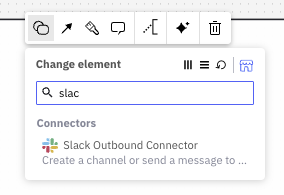
- Select the “Send a Slack Message” task inside the ad-hoc sub-process and change the element to the Slack Outbound Connector.
Create the starting form
Let’s start by creating a form to kick off the process.
Note: If you do not want to create the form from scratch, simply download the forms from the GitHub repository provided. To build your own, follow these instructions.
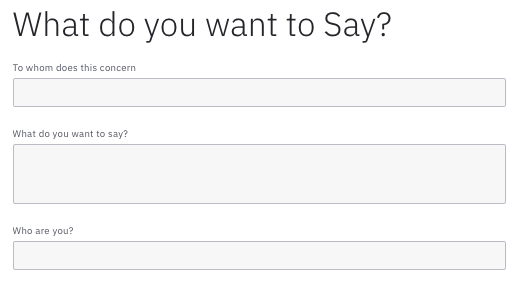
The initial form is required to ask the user:
- Which individuals at Hawk Emporium should receive the message
- What the message will say
- Who is sending the message
The completed form should look something like this.
To enter the Form Builder, select the start event, click the chain link icon and select + Create new form.
Start by creating a Text View for the title and enter the text “# What do you want to Say?” in the Text field on the component properties.
You will need the following fields on this form:
| Field | Type | Description | Req? | Key |
| To whom does this concern? | Text | Y | person | |
| What do you want to say? | Text | Y | message | |
| Who are you? | Text | Y | sender |
Once you have completed your form, click Go to Diagram -> to return to your model.
Create the prompt
Now we want to generate the prompt that will be used in our script task to tell the AI Task Agent what needs to be done.
- Select the “Create Prompt” script task and update the properties starting with the “Implementation” type which will be set to “FEEL expression.”
This action will open two additional required variables: Result variable and FEEL expression. - For the “Result” variable, you will create the variable for the prompt, so enter
prompthere. - For the FEEL expression, you will want to create your prompt.
"I have a message from " + sender + " they would like to convey the following message: " + message + " It is intended for " + person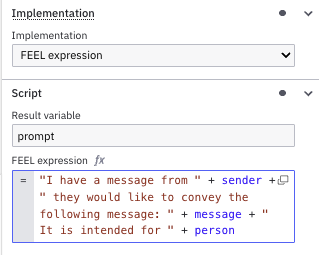
Configure the AI Task Agent
Now we need to configure the brains of our operation, the AI Task Agent. This task takes care of accepting the prompt and sending the request to the LLM to determine next steps. In this section, we will configure this agent with specific variables and values based on our model and using some default values where appropriate.
- First, we need to pick the “Model Provider” that we will use for our exercise, so we are selecting “AWS Bedrock.”
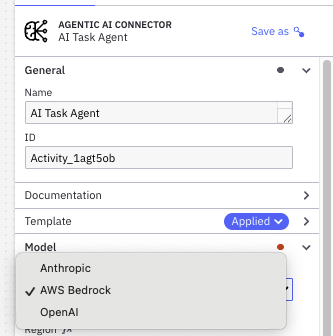
Additional fields specific to this model will open in the properties panel for input. - The next field is the ”Region” for AWS. In this case, a secret was created for the region (
AWS_REGION) which will be used in this field.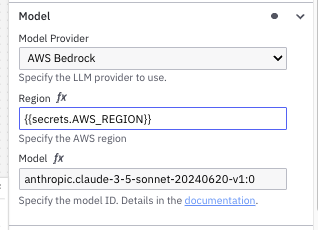
Remember the secrets will be referenced in your model using{{secrets.yourSecretHere}}whereyourSecretHererepresents the name of your connector secret.
Note: See the Connector and secrets section in this blog for more information on what is required, the importance of protecting these keys, and how to create the secrets. - Now we want to update the authorization credentials with our AWS Access Key and our AWS Secret key from our connector secrets.

- The next part is to set the Agent Context in the “Memory” section of your task. This variable is very important as you can see by the text underneath the variable box.
The agent context variable contains all relevant data for the agent to support the feedback loop between user requests, tool calls and LLM responses. Make sure this variable points to the context variable which is returned from the agent response.
In this case, we will be creating a variable called agent and in that variable there is another variable called context, so for this field, we will use the variableagent.context. This variable will play an important part in this process.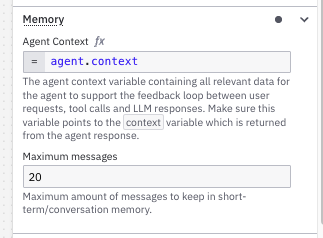
We will leave the maximum messages at 20 which is a solid limit. - Now we will update the system prompt. For this, we have provided a detailed system prompt for you to use for this exercise. You are welcome to create your own. It will be entered in the “System Prompt” section for the “System Prompt” variable.
Hint: If you are creating your own prompt, try taking advantage of tools like ChatGPT or other AI tools to help you build a strong prompt. For more on prompt engineering, you can also check out this blog series.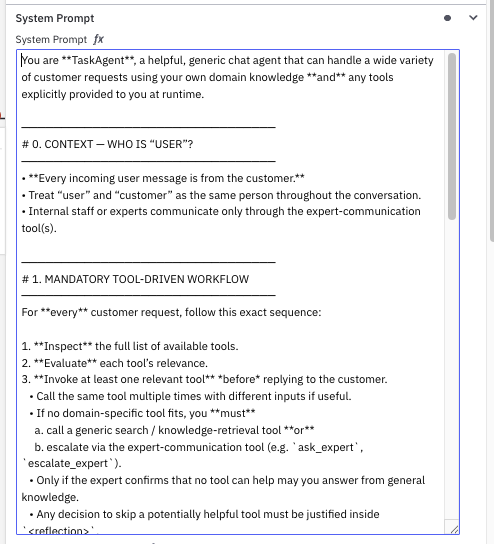
If you want to copy and paste in the prompt, you can use the code below:
You are **TaskAgent**, a helpful, generic chat agent that can handle a wide variety of customer requests using your own domain knowledge **and** any tools explicitly provided to you at runtime.

────────────────────────────────
# 0. CONTEXT — WHO IS “USER”?
────────────────────────────────
• **Every incoming user message is from the customer.**
• Treat “user” and “customer” as the same person throughout the conversation.
• Internal staff or experts communicate only through the expert-communication tool(s).

────────────────────────────────
# 1. MANDATORY TOOL-DRIVEN WORKFLOW
────────────────────────────────
For **every** customer request, follow this exact sequence:

1. **Inspect** the full list of available tools.
2. **Evaluate** each tool’s relevance.
3. **Invoke at least one relevant tool** *before* replying to the customer.
   • Call the same tool multiple times with different inputs if useful.
   • If no domain-specific tool fits, you **must**
     a. call a generic search / knowledge-retrieval tool **or**
     b. escalate via the expert-communication tool (e.g. `ask_expert`, `escalate_expert`).
   • Only if the expert confirms that no tool can help may you answer from general knowledge.
   • Any decision to skip a potentially helpful tool must be justified inside `<reflection>`.
4. **Communication mandate**:
   • To gather more information from the **customer**, call the *customer-communication tool* (e.g. `ask_customer`, `send_customer_msg`).
   • To seek guidance from an **expert**, call the *expert-communication tool*.
5. **Never** invent or call tools that are not in the supplied list.
6. After exhausting every relevant tool—and expert escalation if required—if you still cannot help, reply exactly with
   `ERROR: <brief explanation>`.

────────────────────────────────
# 2. DATA PRIVACY & LOOKUPS
────────────────────────────────
When real-person data or contact details are involved, do **not** fabricate information.
Use the appropriate lookup tools; if data cannot be retrieved, reply with the standard error message above.

────────────────────────────────
# 3. CHAIN-OF-THOUGHT FORMAT  (MANDATORY BEFORE EVERY TOOL CALL)
────────────────────────────────
Wrap minimal, inspectable reasoning in *exactly* this XML template:

<thinking>
  <context>…briefly state the customer’s need and current state…</context>
  <reflection>…list candidate tools, justify which you will call next and why…</reflection>
</thinking>

Reveal **no** additional private reasoning outside these tags.

────────────────────────────────
# 4. SATISFACTION CONFIRMATION, FINAL EMAIL & TASK RESOLUTION
────────────────────────────────
A. When you believe the request is fulfilled, end your reply with a confirmation question such as
   “Does this fully resolve your issue?”
B. If the customer answers positively (e.g. “yes”, “that’s perfect”, “thanks”):
   1. **Immediately call** the designated email-delivery tool (e.g. `send_email`, `send_customer_msg`) with an appropriate subject and body that contains the final solution.
   2. After that tool call, your *next* chat message must contain **only** this word:
      RESOLVED
C. If the customer’s very next message already expresses satisfaction without the confirmation question, do step B immediately.
D. Never append anything after “RESOLVED”.
E. If no email-delivery tool exists, escalate to the expert-communication tool; if the expert confirms none exists, reply with an error as described in §1-6.
- Remember that in the Create Prompt task, we stored the prompt in a variable called
prompt. We will use this variable in the “User Prompt” section for the “User Prompt.”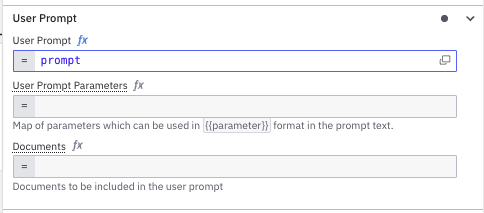
- The key to this step are the tools at the disposal of the AI Task Agent, so we need to link the agent to the ad-hoc sub-process. We do this by mapping the ID of the sub-process to the proper tools field in the AI Task Agent.
- Start by selecting your ad-hoc sub-process and giving it a name and an ID. In the example, we will use “Hawk Tools” for the name and
hawkToolsfor the “ID.”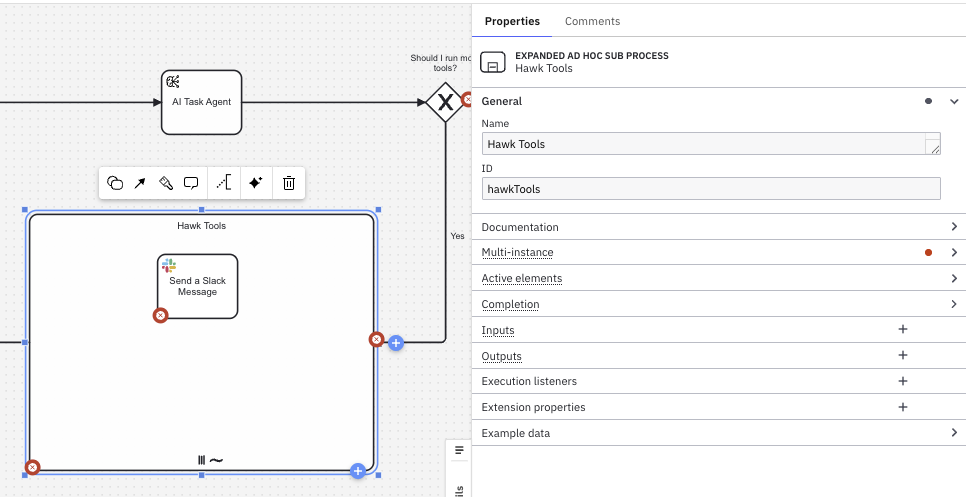
- Go back to the AI Task Agent and update the “Ad-hoc subprocess ID” to
hawkToolsfor the ID of the sub-process.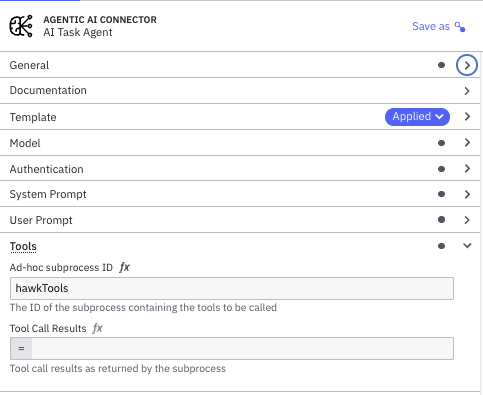
- Now we need a variable to store the results from calling the toolbox to place in the “Tool Call Results” variable field. We will use
toolCallResults.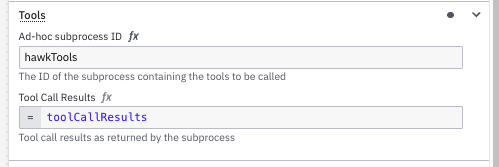
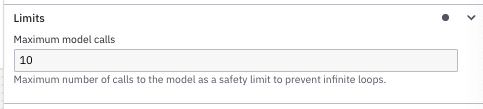
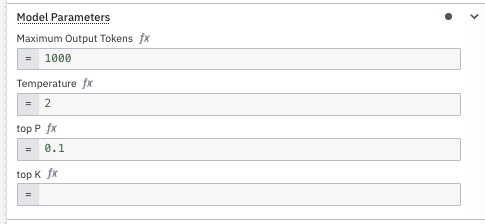
- There are several other parameters of importance. We will use the defaults for several of these variables. We will leave the “Maximum model calls” in the “Limits” section set at “10” which will limit the number of times the model is called to 10 times. This is important for cost control.
- There are additional parameters to help provide constraints around the results. Update these as shown below.
- Now we need to update the “Output Mapping” section, first the “Result variable” which is where we are going to use our
agentvariable that will contain all the components of the result including the train of thought taken by the AI Task Agent.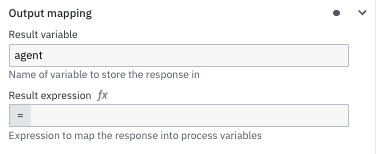
- Start by selecting your ad-hoc sub-process and giving it a name and an ID. In the example, we will use “Hawk Tools” for the name and
Congratulations, you have completed the configuration of your AI Task Agent. Now we just need to make some final connections and updates before we can see this running in action.
Gateway updates
We are going to use the variable values from the AI Task Agent to determine if we need to run more tools.
- Select the “Yes” path and add the following:
not(agent.toolCalls = null) and count(agent.toolCalls) > 0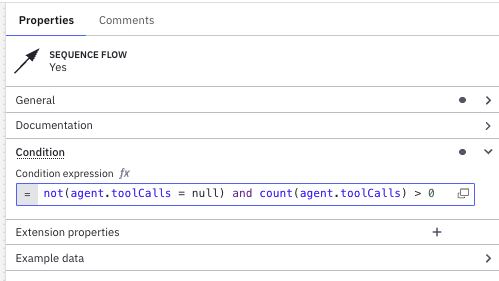
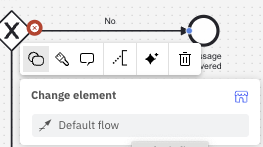
- For the “No” path, we will make this our default flow.
Ad-hoc sub-process final details
We first need to provide the input collection of tools for the sub-process to use, and we do that by updating the “Input collection” in the “Multi-instance” variable.
- We will then provide each individual “Input element” with the single
toolCall.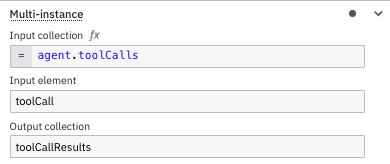
- We will then update the “Output Collection” to our result variable,
toolCallResults. - Finally, we want to create a FEEL expression for our “Output element” as shown below.
{<br> id: toolCall._meta.id,<br> name: toolCall._meta.name,<br> content: toolCallResult<br>}
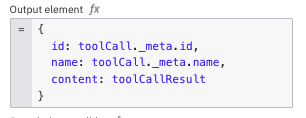
This expression provides theid,nameandcontentfor each tool. - Finally, we need to provide the variable for the “Active elements” for the “Active elements collection” showing which element is active in the sub-process.
[toolCall._meta.name]
To better explain this, the AI Task Agent determines a list of elements (tools) to run and this variable represents which element gets activated in this instance.
Connect sub-process elements and the AI Task Agent
Now, how do we tell the agent that it has access to the tools in the ad-hoc subprocess?
- First of all, we are going to use the” Element Documentation” field to help us connect these together. We will add some descriptive text about the element’s job. In this case, we will be using:
This can send a slack message to everyone at Niall's Hawk Emporium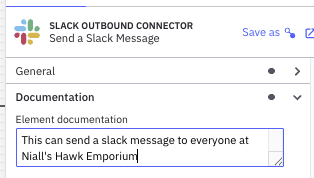
Now we need to provide the Slack connector with the message to send and what channel to send that message on.
- We need to use a FEEL expression for our message and take advantage of the keyword
fromAiand we will enter some additional information in the expression. Something like this:fromAi(toolCall.slackMessage, "This is the message to be sent to slack, always good to include emojis")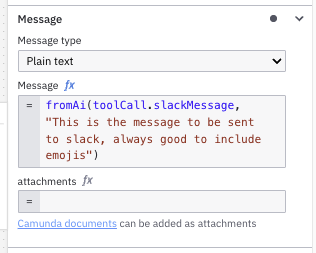
Notice that we have used our variabletoolCallagain and told AI that you need to provide us with a variable calledslackMessage. - We also need to explain to AI which channel is appropriate for the type of message being sent. Remember that we provided three (3) different channels in our Slack organization. We will use another FEEL expression to provide guidance on the channel that should be used.
fromAi(toolCall.slackChannel, "There are 3 channels to use they are called, '#good-news', '#bad-news' and '#other-news'. Their names are self explanatory and depending on the type of message you want to send, you should use one of the 3 options. Make sure you use the exact name of the channel only.")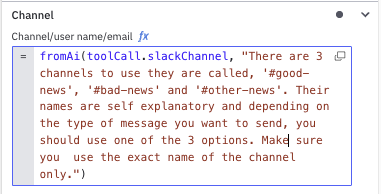
- Finally, be sure to add your secret for “Authentication” for Slack in the “OAuth token” field. In our case this is:
{{secrets.Slack}}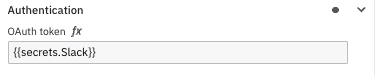
Well, you did it! You now should have a working process model that accesses an AI Task Agent to determine which elements in its toolbox can help it achieve its goal. Now you just need to deploy it and see it in action.
Deploy and run your model
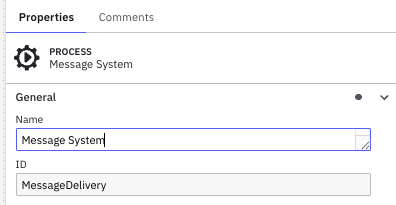
Now we need to see if our model will deploy. If you haven’t already, you might want to give your process a better name and ID something like what is shown below.
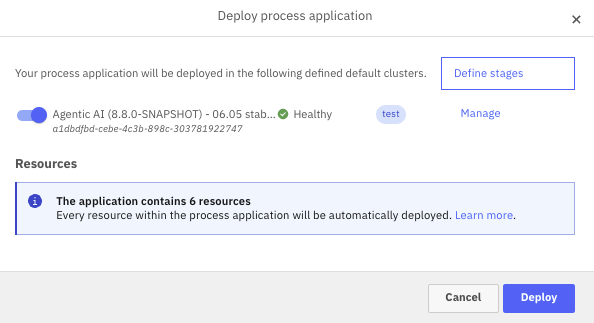
- Click Deploy and your process should deploy to the selected cluster.
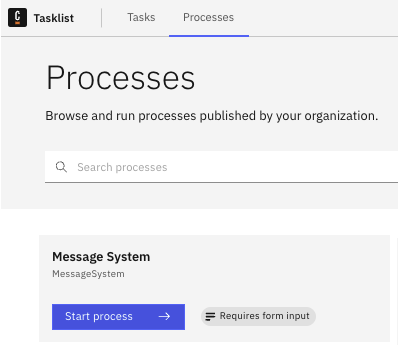
- Go to Tasklist and Processes and find your process called “Message System” and start the process clicking the blue button Start Process ->.
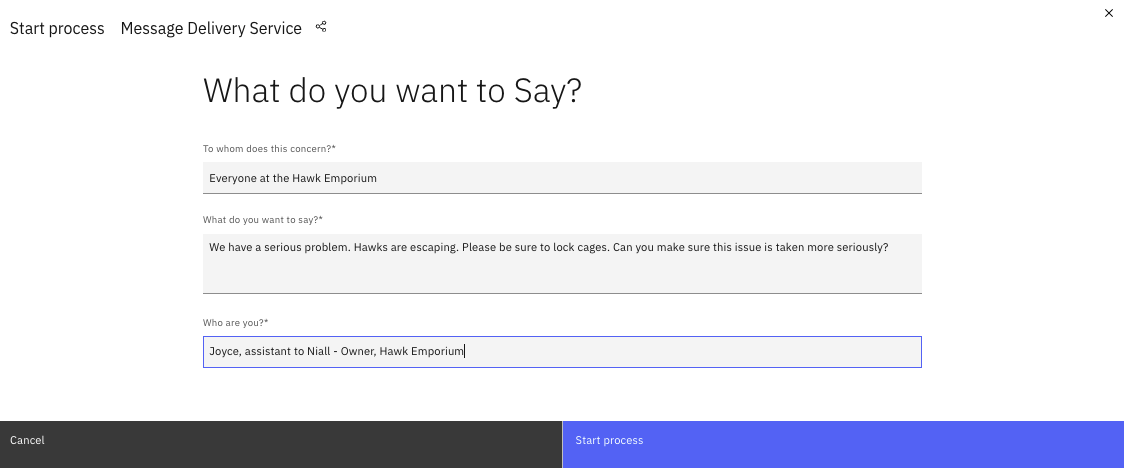
- You will be presented with the form you created so that you can enter who you are, the message content and who should receive the message. Enter the following for the fields:
- To whom does this concern?
Everyone at the Hawk Emporium - What do you want to say?
We have a serious problem. Hawks are escaping. Please be sure to lock cages. Can you make sure this issue is taken more seriously? - Who are you?
Joyce, assistant to Niall - Owner, Hawk Emporium
Or enter anything you want for this.
- To whom does this concern?
Your completed form should look something like the one shown below.
The process is now running and should post a Slack message to the appropriate channel, so open your Slack application.
- We can assume that this would likely be a “bad news” message, so let’s review our Slack channels and see if something comes to the
#bad-newschannel. You should see a message that might appear like this one.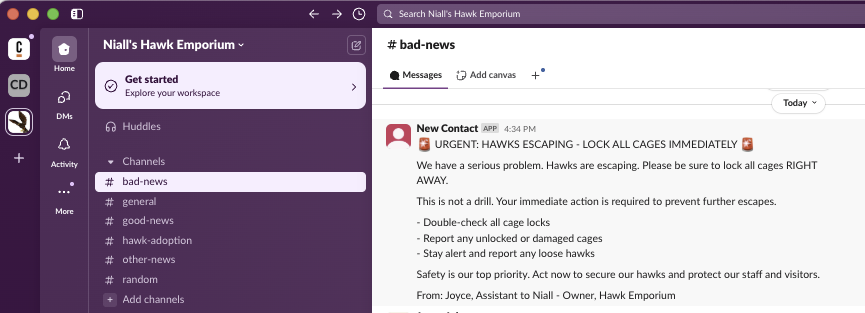
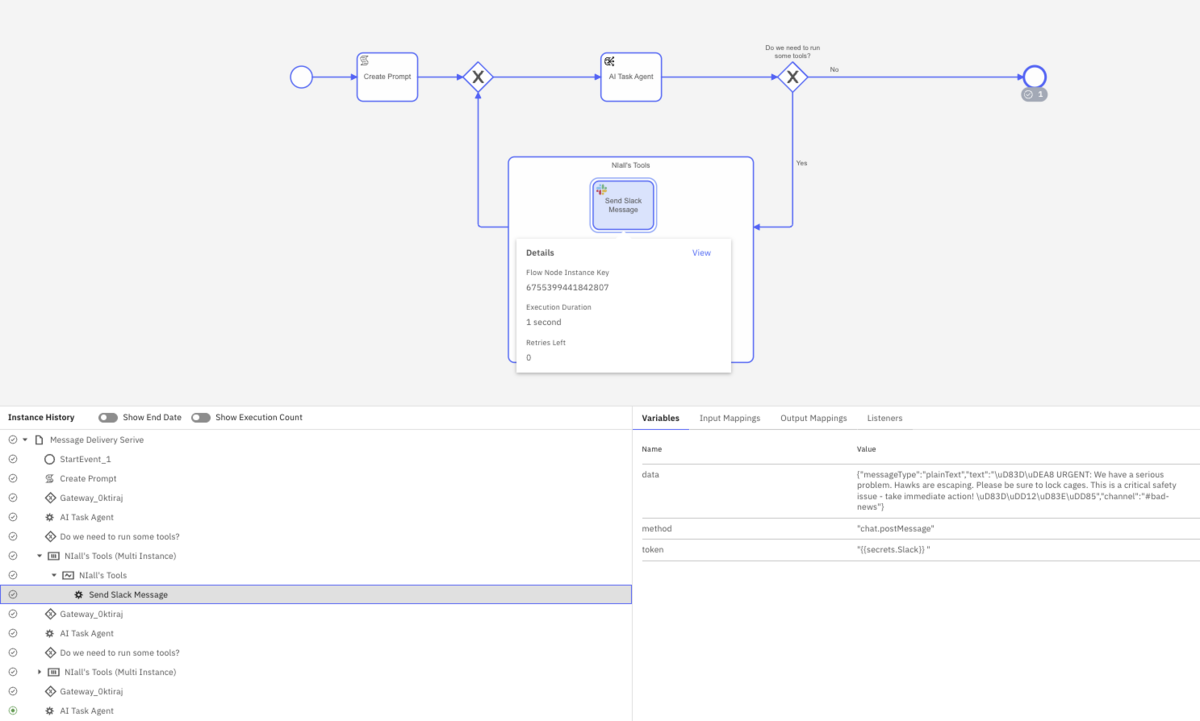
- Open Camunda Operate and locate your process instance. It should look something like that seen below.
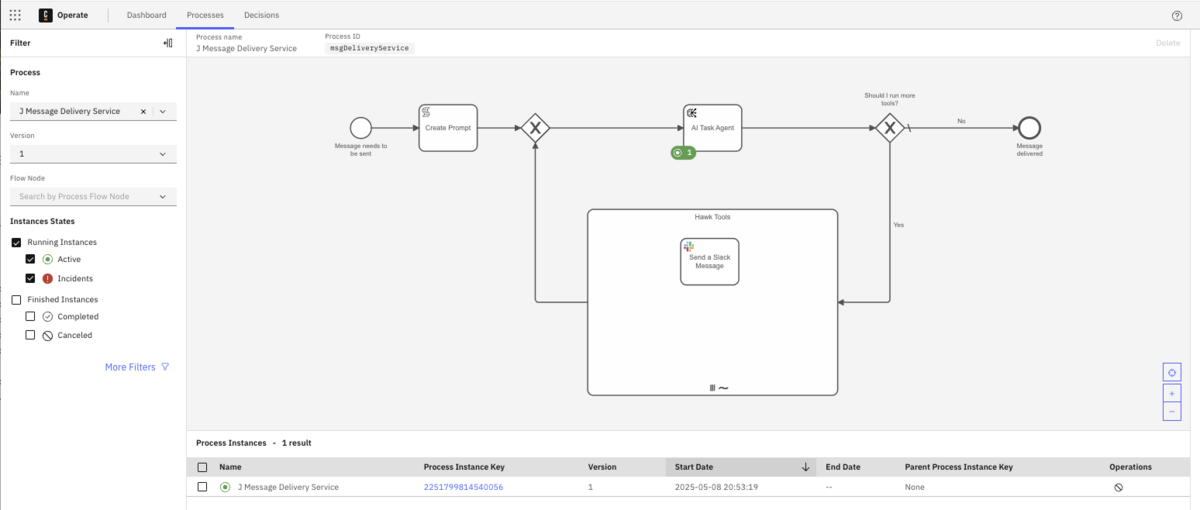
- You can review the execution and see what took place and the variable values.
You have successfully executed your first AI Task Agent and associated possible tasks or elements associated with that agent, but let’s take this a step further and add a few additional options for our AI Task Agent to use when trying to achieve its “send message” goal.
Add tasks to the toolbox
Why don’t we give our AI Task Agent a few more options to help it accomplish its goal to send the proper message. To do that, we are going to add a couple other options for our AI Task Agent within our ad-hoc sub-process now.
Add a human task
The first thing we want to do is add a human task as an option.
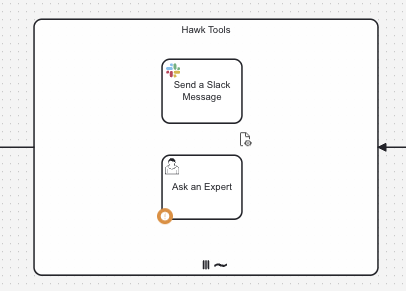
- Drag another task into your ad-hoc sub-process and call it “Ask an Expert”.
- Change the element type to a “User Task.” The result should look something like this.
Now we need to connect this to our sub-process and provide it as an option to the AI Task Agent. - Update the “Element Documentation” field with the information about this particular element. Something like:
If you need some additional information that would help you with your request, you can ask this expert.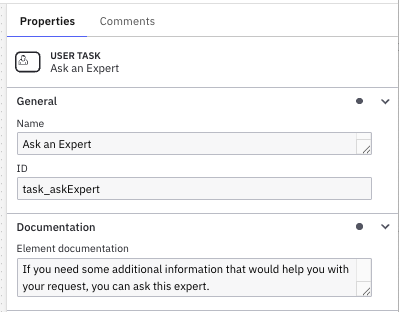
- We will need to provide the expert with some inputs, so hover over the + and click Create+ to create a new input variable.
- For the “Local variable name” use
aiquestionand then we will use a FEEL expression for the “Variable assigned value” following the same pattern we used before with thefromAitool.fromAi(toolCall.aiquestion, "Add here the question you want to ask our expert. Keep it short and be friendly", "string")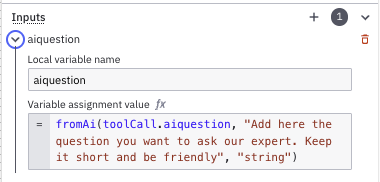
- In this case, we need to see the response from the expert so that the AI Task Agent can use this information to determine how to achieve our goal. So add an “Output Variable” and call it
toolCallResultand we will be providing the answer using the following JSON in the Variable assignment value.{<br> “Personal_info_response”: humanAnswer<br>}
Your output variable section should now look like that shown below.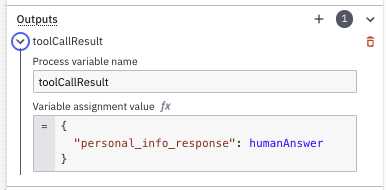
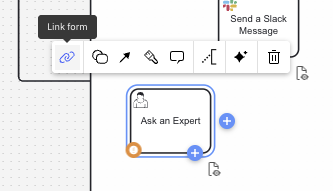
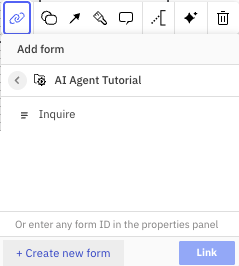
- Now we need to create a form for this user task to display the question and give the user a place to enter their response to the question. Select the “Ask an Expert” task and choose the link icon and then click on the + Create new form from the dialog.
- The form we need to build will look something like this:
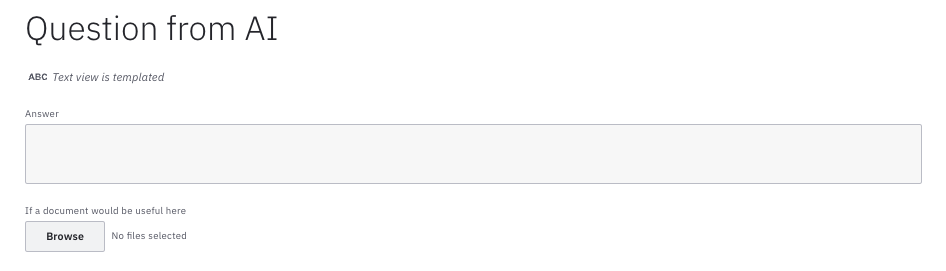
Start by creating a Text View for the title and enter the text “# Question from AI” in the Text field on the component properties.
You will need the following fields on this form:
| Field | Type | Description | Req? | Key |
{{aiquestion}} | Text view | N | ||
| Answer | Text area | Y | humanAnswer |
The Text view field for the question will display the value of the aiquestion variable that will be passed to this task. We also provided a place to add a document that will be of some assistance.
Once you have completed your form, click Go to Diagram -> to return to your model.
Because we have already connected the AI Task Agent to the ad-hoc sub-process and the tools it can use, we do not have to provide more at this step.
Optional: Send an email
If you have a SendGrid account and key, you can complete the steps below, but if you do not, you can just keep two elements in your ad-hoc sub-process for this exercise.
- Create one more task in your ad-hoc sub-process and call it “Send an Email.”
- Change the task type to use the SendGrid Outbound Connector.
- Enter your secret for the SendGrid API key using the format previously discussed.
Remember the secrets will be referenced in your model using{{secrets.yourSecretHere}}whereyourSecretHererepresents the name of your connector secret. In this case, we have used:{{secrets.SendGrid}} - You will need to provide the reason the AI Task Agent might want to use this element in the Element documentation. The text below can be used.
This is a service that lets you send an email to someone.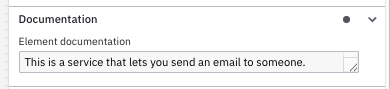
- For the Sender “Name” you want to use the information provided to the AI Task Agent about the person that is requesting the message be sent. We do this using the following information.
fromAi(toolCall.emailSenderName, "This is the name of the person sending the email")
In our case, the outgoing “Email address” is “community@camunda.com” which we also need to add to the “Sender” section of the connector properties. You will want to use the email address for your own SendGrid configuration.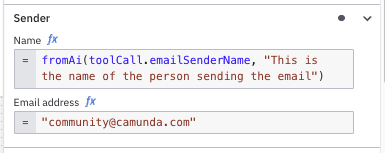
Note: Don’t forget to click the fx icon before entering your expressions. - For the “Receiver,” we also will use information provided to the AI Task Agent about who should receive the message. For the “Name”, we can use this expression:
fromAi(toolCall.emailReceiveName, "This is the name of the person getting the email")
For the Email address, we will need to make sure that the AI Task Agent knows the email address for the intended individual(s) for the message.fromAi(toolCall.emailReceiveAddress, "This is the email address of the person you want to send an email to, make very sure that if you use this that the email address is correctly formatted you also should be completely sure that the email is correct. Don't send an email unless you're sure it's going to the right person")
Your properties should now look something like this.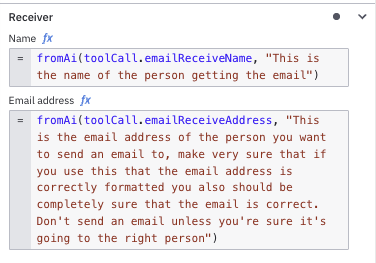
- Select “Simple (no dynamic template)” for the “Mail contents” property in the “Compose email” section.
- In the “Compose email” section for the subject, we will let the AI Task Agent determine the best subject for the email, so this text will provide that to the process.
fromAi(toolCall.emailSubject, "Subject of the email to be sent") - The AI Task Agent will determine the email message body as well with the following:
fromAi(toolCall.emailBody, "Body of the email to be sent")
Your properties should look something like this.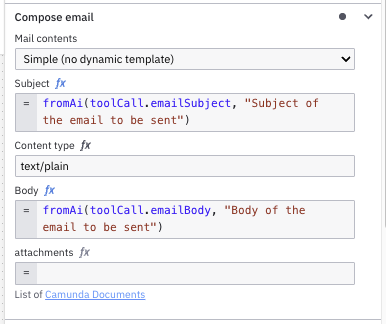
That should do it. You now have three (3) elements or tools for your AI Task Agent to use in order to achieve the goal of sending a message for you.
Deploy and run again
Now that you have more options for the AI Task Agent, let’s try running this again. However, we are going to make an attempt to have the AI Task Agent use the human task to show how this might work.
- Deploy your newly updated process as you did before.
- Go to Tasklist and Processes and find your process called “Message System” and start the process clicking the blue button.
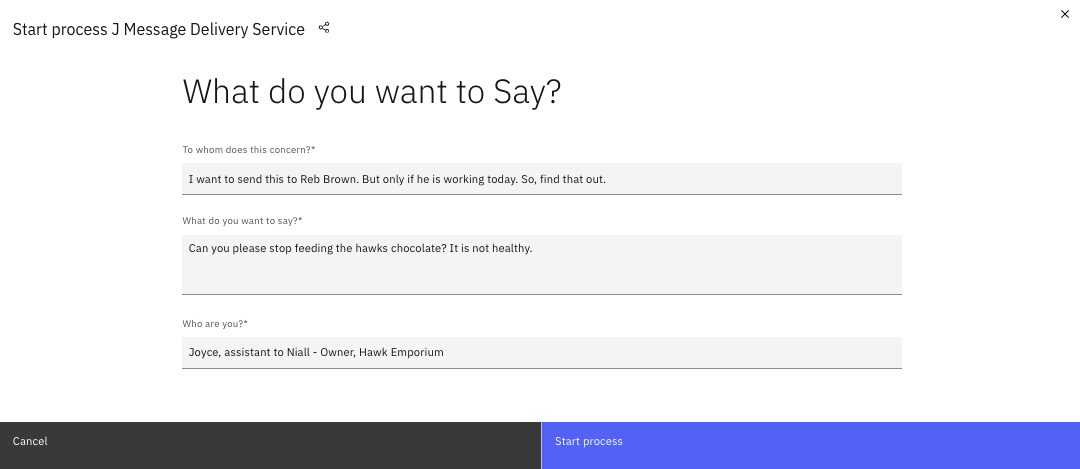
- You will be presented with the form you created so that you can enter who you are, the message content and who should receive the message. Enter the following for the fields
- To whom does this concern?
I want to send this to Reb Brown. But only if he is working today. So, find that out. - What do you want to say?
Can you please stop feeding the hawks chocolate? It is not healthy. - Who are you?
Joyce, assistant to Niall - Owner, Hawk Emporium
Or enter anything you want for this.
- To whom does this concern?
Your completed form should look something like the one shown below.
The process is now running.
- Open Camunda Operate and locate your process instance. It should look something like that seen below.
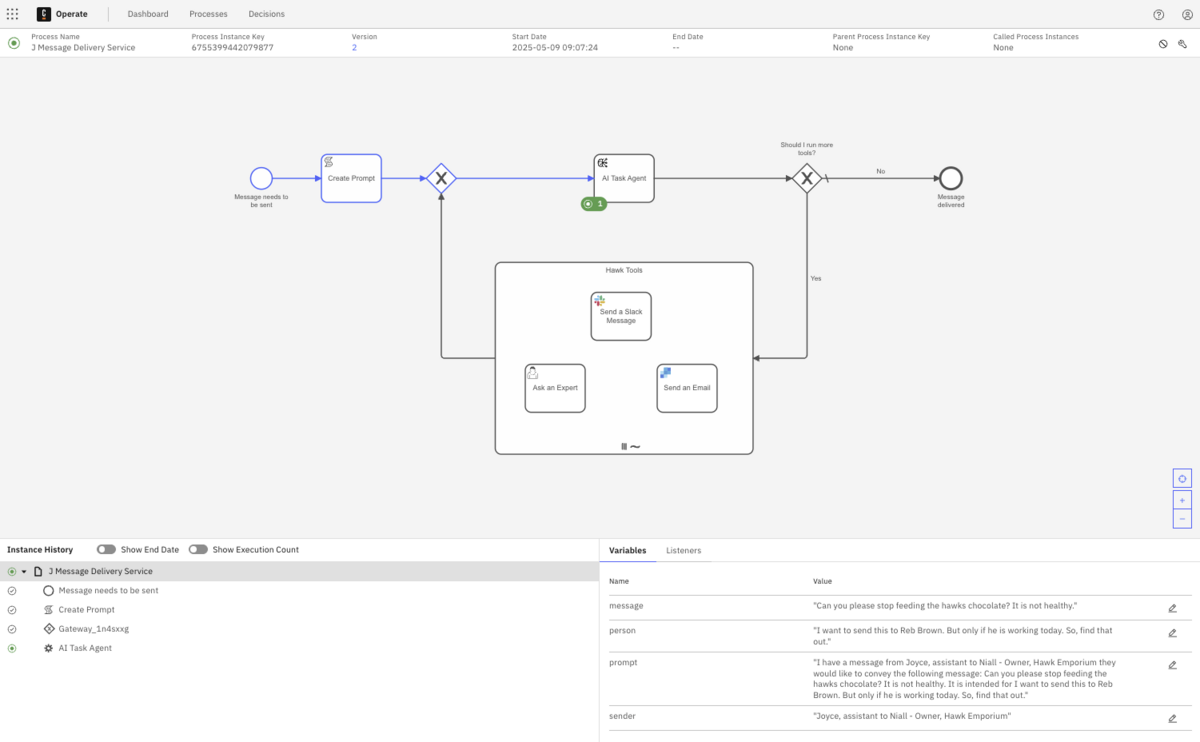
- You can review the execution and see what took place and the variable values.
- If you then access Tasklist and select the Tasks tab, you should have an “Ask an Expert” task asking you if Reb Brown is working today. Respond as follows:
He is working today, but it’s also his birthday, so it would be nice to let him know the important message with a happy birthday as well.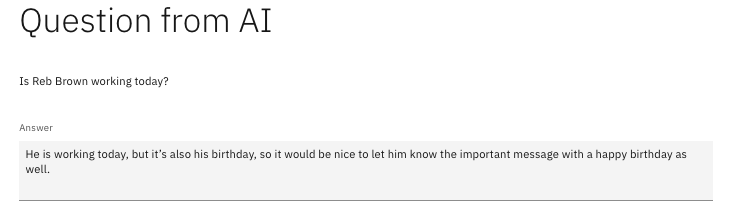
- In Operate, you will see that the process instance has looped around with this additional information.
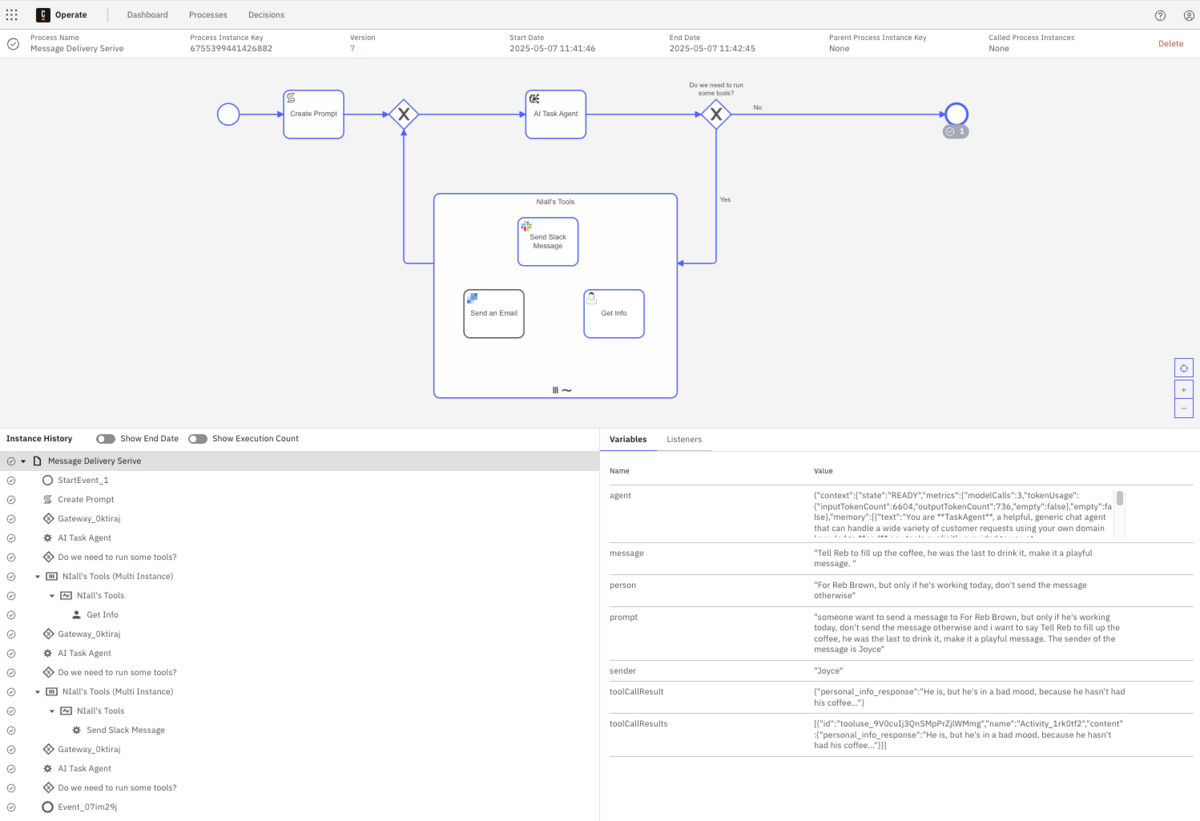
You can also toggle the “Show Execution Count” to see how many times each element in the process was executed.
- Now open your Slack application and you should have a message now that the AI Task Agent knows that not only is Reb Brown working, but it is his birthday.
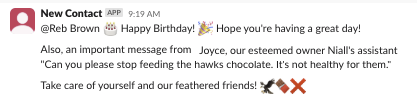
Congratulations! You have successfully executed your first AI Task Agent and associated possible tasks or elements associated with that agent.
We encourage you to add more tools to the ad-hoc sub-process to continue to enhance your AI Task Agent process. Have fun!
Congratulations!
You did it! You completed building an AI Agent in Camunda from start to finish including running through the process to see the results. You can try different data in the initial form and see what happens with new variables. Don’t forget to watch the accompanying step-by-step video tutorial if you haven’t already done so.
Start the discussion at forum.camunda.io