
Ad-hoc sub-processes are a new feature in Camunda 8.7 that allow you to define what task or tasks are to be performed during the execution of a process instance. Who or what decides which of the tasks are to be performed could be a person, rule, microservice, or artificial intelligence.
In this example, you’ll decide what those tasks are, and later on you’ll be able to add more tasks as you work through the process. We’ll use decision model and notation (DMN) rules along with Friendly Enough Expression Language (FEEL) expressions to carry out the logic. Let’s get started!
Table of contents
Download and install Camunda 8 Run
Download and install Camunda Desktop Modeler
Create a process using an ad-hoc sub-process
Add logic for sequential or parallel tasks
Create a form to add more tasks and to include a breadcrumb trail for visibility
You’ve built your ad-hoc sub-process!
SaaS or C8Run?
You can choose either Camunda SaaS or Self-Managed. Camunda provides a free 30-day SaaS trial, or you can choose Self-Managed. I recommend using Camunda 8 Run to simplify standing up a local environment on your computer.
The next sections provide links to assist you in installing Camunda 8 Run and Desktop Modeler. If you’ve already installed Camunda or are using SaaS, you can skip to Create a process using an ad-hoc sub-process.
If using Saas, be sure to create an 8.7 cluster first.
Download and install Camunda 8 Run
For detailed instructions on how to download and install Camunda 8.7 Run, refer to our documentation. Once you have it installed and running, continue on your journey right back here!
Download and install Camunda Desktop Modeler
Download and install Desktop Modeler. You may need to open the Alternative downloads dropdown to find your desired installation.
Select the appropriate operating system and follow the instructions to start Modeler up. We’ll use Desktop Modeler to create and deploy applications to Camunda 8 Run a little bit later.
Create a process using an ad-hoc sub-process
Start by creating a process that will let you select from a number of tasks to be executed in the ad-hoc sub-process.
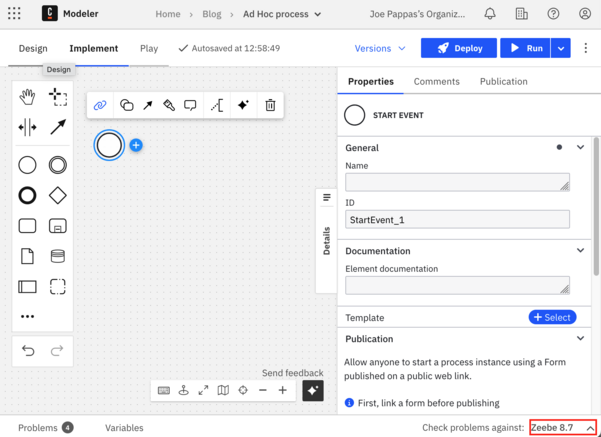
Open Modeler and create a new process diagram. This post uses SaaS and Web Modeler, but the same principles apply to Desktop Modeler. Be sure to switch versions, if not set correctly already, to 8.7, as ad-hoc sub-processes are available to Camunda 8.7 and later versions.
Next, add an ad-hoc sub-process after the start event; add a task and click the Change element icon.
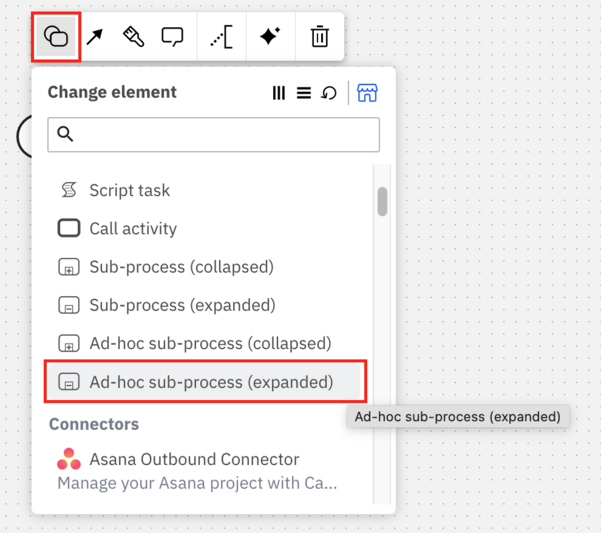
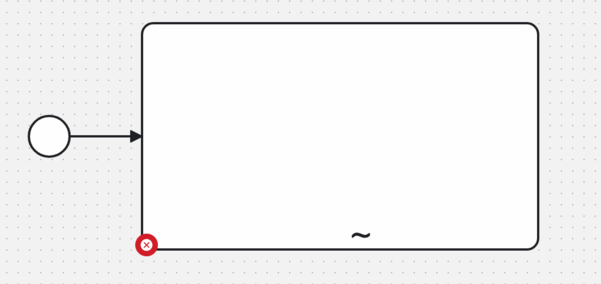
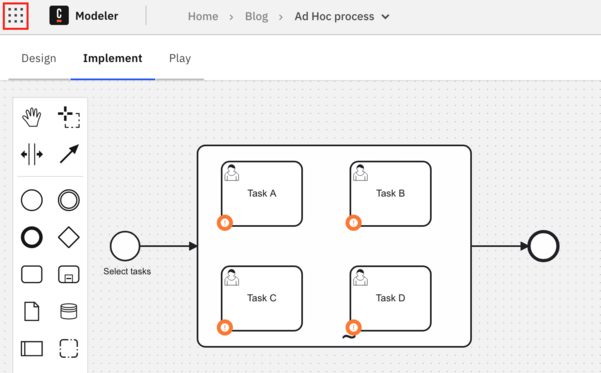
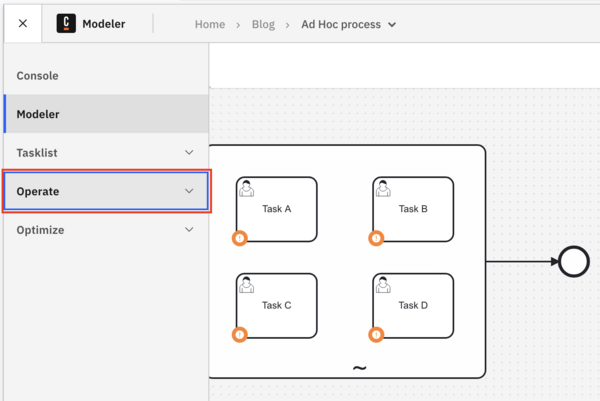
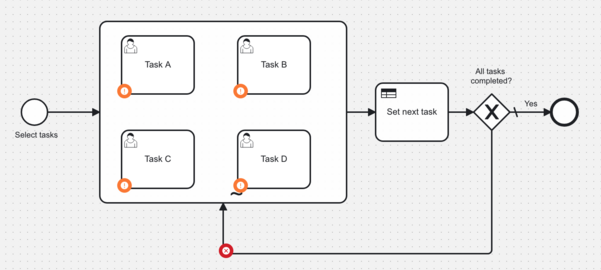
Your screen should look something like this. Notice the tilde (~) denoting the ad-hoc sub-process:
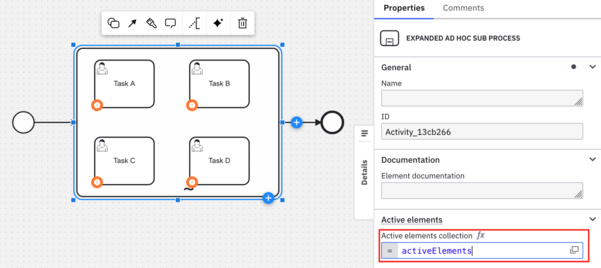
Now add four User Tasks to the subprocess. We’ll label them Task A, Task B, Task C, and Task D. Be sure to update the ID for each of the tasks to Task_A, Task_B, Task_C, and Task_D. We’ll use these IDs later to determine which of the tasks to execute.
You can ignore the warnings indicating forms should be associated with User Tasks.
Add an end event after the ad-hoc sub-process as well.

Add a collection (otherwise known as an array) to the ad-hoc sub-process that determines what task or tasks should be completed within it.
Put focus on the ad-hoc sub-process and add the variable activeElements to the Active elements collection property in the Properties panel of the ad-hoc sub-process. You’ll need to pass in this collection from the start of the process.
Now you need to update the start event by giving it a name and adding a form to it. Put focus on the start event and enter in a name. It can be anything actually, but it’s always a best practice to name events. This post uses the name Select tasks.
Click the link icon above the start event and click Create new form.
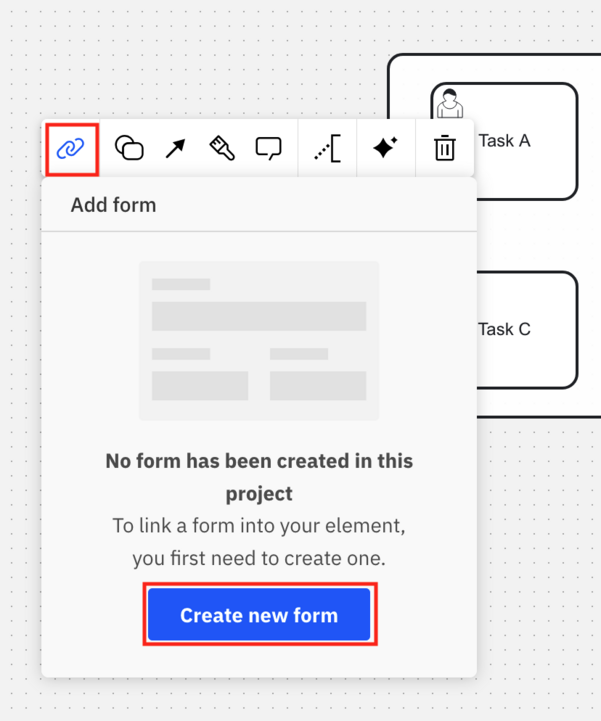
The form should take the name of the start event: Select tasks.
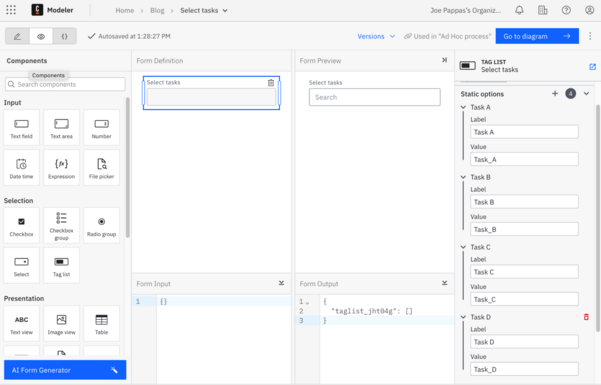
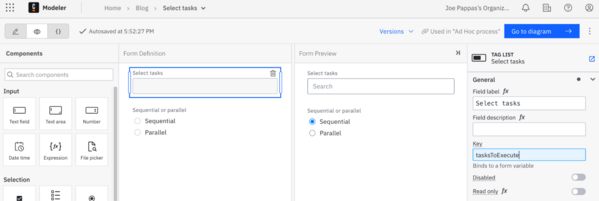
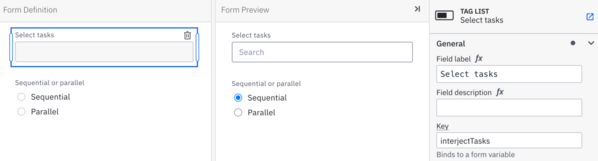
Now drag and drop a Tag list form element onto the Form Definition panel.
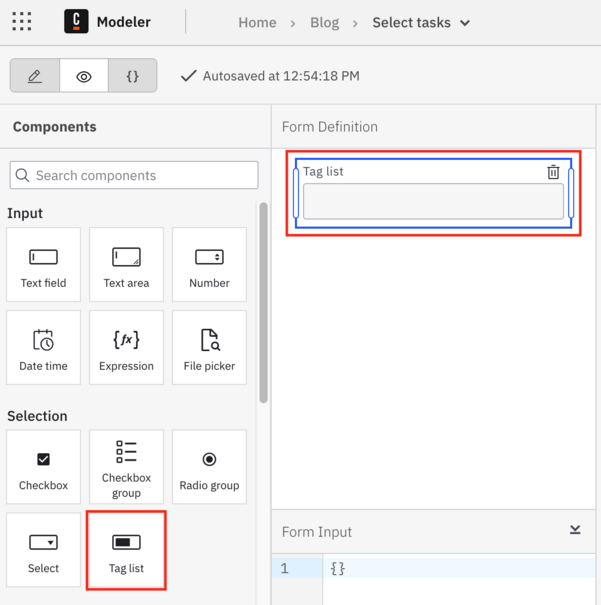
The Tag list form element allows users to select from an array of items and pass it to Camunda as an array.
Next, update the Field label in the Tag list element to Select tasks and the Key to activeElements.
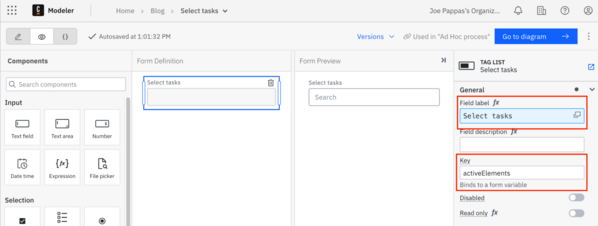
By default, a Tag list uses Static options with one default option, and we’ll use that in this example. Add three more static options and rename the Label and Value of each to Task A, Task_A; Task B, Task_B; Task C, Task_C; and Task D, Task_D.
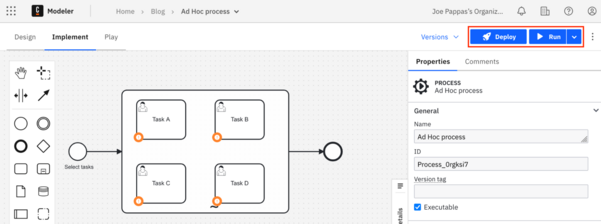
Let’s run the process! Click Deploy and Run. For SaaS, be sure to switch back to the ad-hoc sub-process diagram to deploy and run it.
You can also shortcut this by simply running the process, as running a process also deploys it.
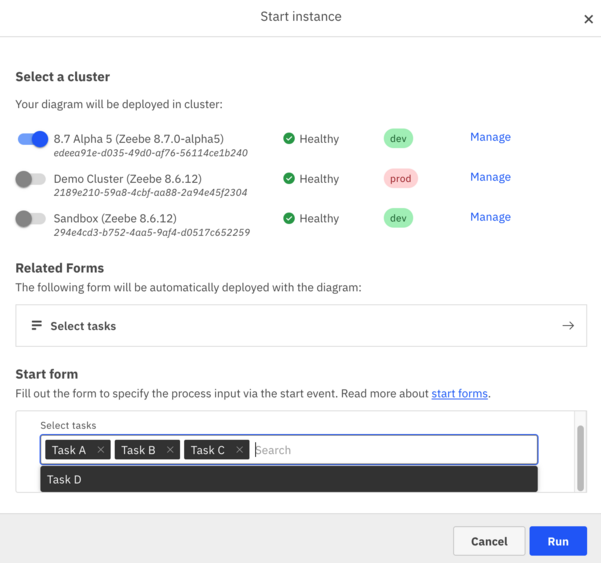
You’ll receive a prompt asking which Camunda cluster to deploy to, but there is only one choice. Deploy and run processes from Desktop Modeler to Camunda 8 Run.
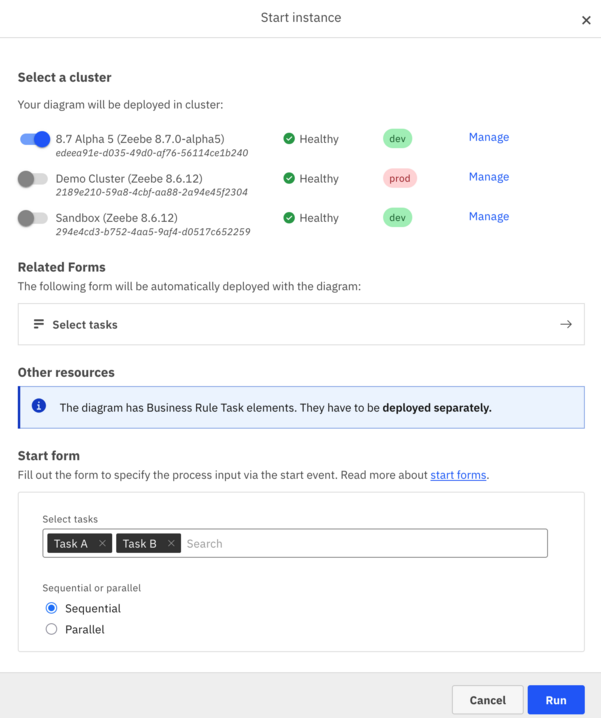
Upon running a process instance, you should see the screen we created for the start event. Select one or more tasks and submit the form. This post selects Task A, Task B, and Task C. Click Run to start the process.
A pop-up gives you a link to Camunda’s administrative console, Operate. If you happen to miss the pop-up, you can always click the grid icon in the upper left corner in Web Modeler. Select Operate in the menu.
Check out the documentation to see how to get to Operate in Camunda 8 Run.
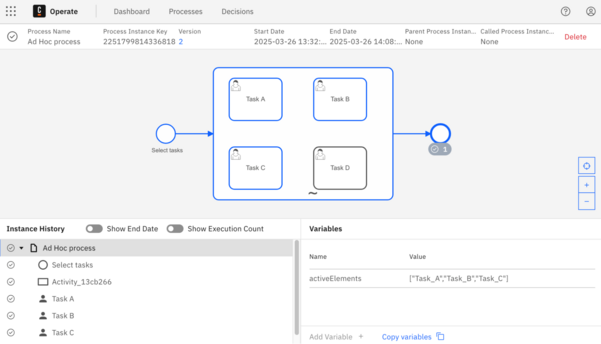
Once in Operate, you should see your process definition. You can navigate to the process instance by clicking through the hyperlinks. If you caught the link in Web Modeler, you should be brought to the process instance directly. You should see something like this:

As you can see, the process was started, the ad-hoc sub-process was invoked, and Task A, Task B, and Task C are all active. This was accomplished by passing in the activeElements variable set by the Tag list element in the Start form.
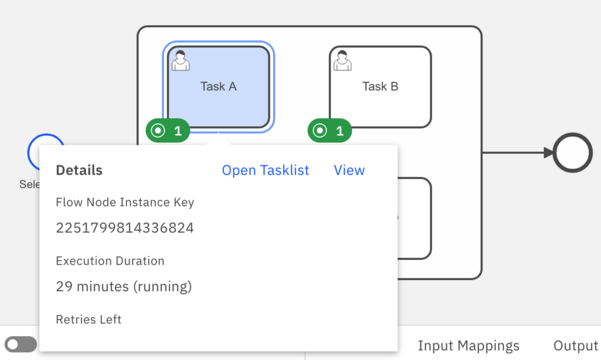
You can switch to Tasklist to complete the tasks. The ad-hoc sub-process will not complete until all three tasks are completed. Navigate to a task by clicking on it in the process diagram panel and clicking Open Tasklist in the dialog box.
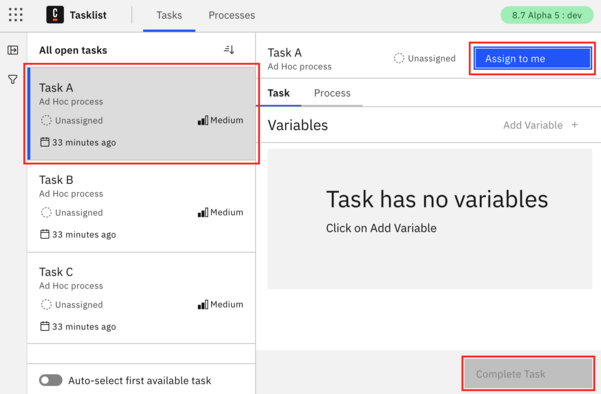
You should see all three tasks in Tasklist. Complete them by selecting each one, then click Assign to me and then click Complete Task.
Once all three tasks are complete, you can return to Operate and confirm the process has completed.
Now that you understand the basics of ad-hoc sub-processes, let’s add more advanced behavior:
- What if you wanted to be able to decide whether those tasks are to be completed in parallel or in sequence?
- What if you wanted to add more tasks to the process as you execute them?
- What if you wanted a breadcrumb trail of the tasks that have been completed or will be completed?
In the next section, we’ll add rules and expressions to handle these scenarios. If you get turned around in the pursuit of building this example, we’ll provide solutions to help out.
Add logic for sequential or parallel tasks
Now we’ll add logic to allow the person starting the process to decide whether to run the selected tasks in sequence or in parallel. We’ll add a radio button group, an index variable, FEEL expressions, and rules to handle this.
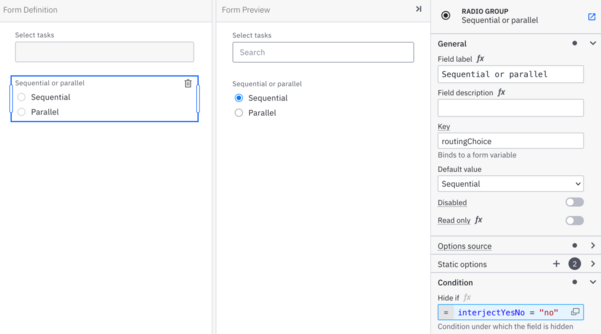
Go back to the Select tasks form in Web Modeler. Add a Radio group element to the form.
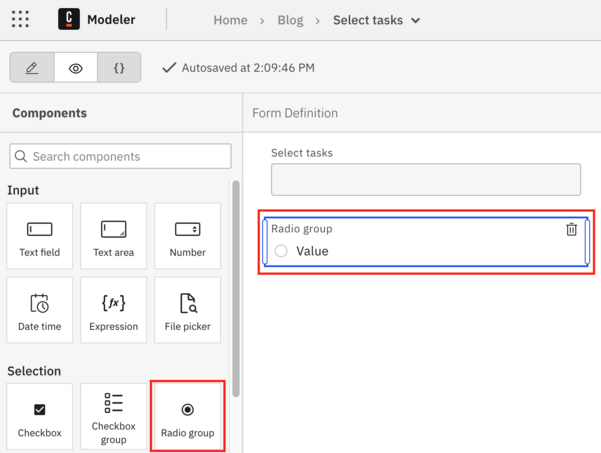
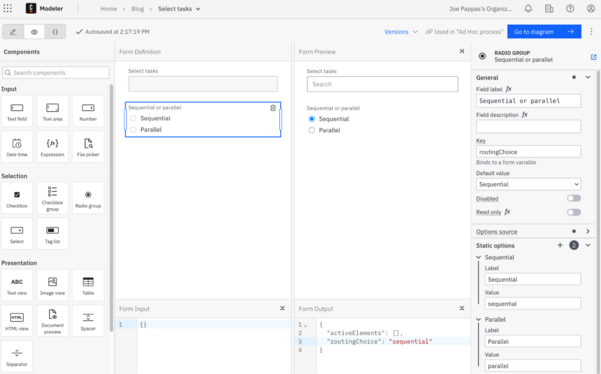
Update the Radio group element, selecting a Label of Sequential or Parallel and Static options of Sequential with a value of sequential and Parallel with a value of parallel. Update the Key to routingChoice and set the Default value to Sequential. Your screen should look something like this:
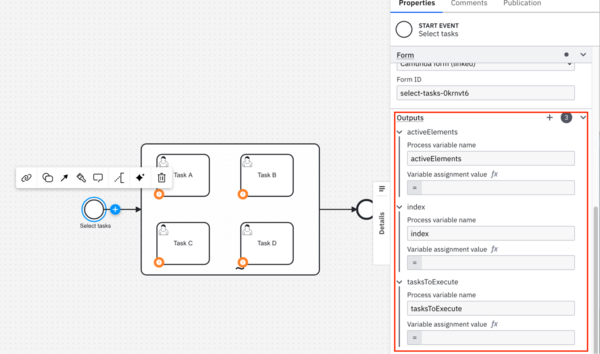
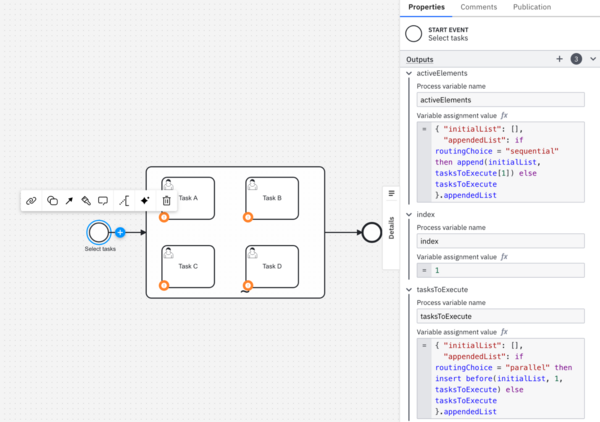
Now you need to add some outputs to the Select tasks start event. Go back to the ad-hoc sub-process diagram and put focus on the Select tasks start event. Add the following Outputs, as shown below:
activeElementsindextasksToExecute
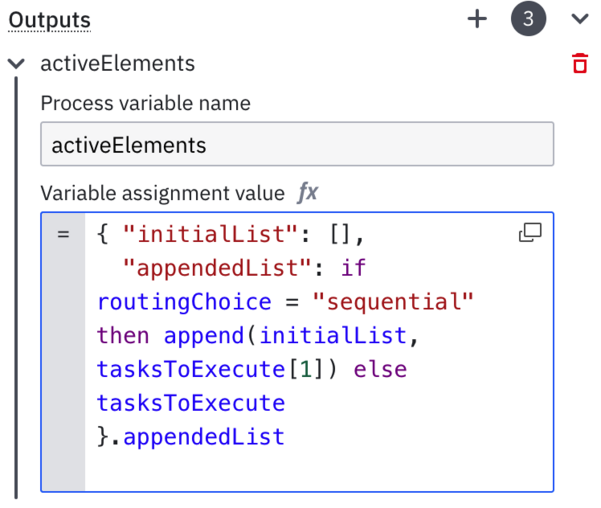
Next, update each with a FEEL expression. For activeElements, add the following expression:
{ "initialList": [],
  "appendedList": if routingChoice = "sequential" then append(initialList, tasksToExecute[1]) else tasksToExecute
}.appendedList
If you recall, activeElements is the collection of the task or tasks that are to be executed in the ad-hoc sub-process. Before, you simply passed the entire list, but now that you can choose between sequential or parallel behavior, you need to update the logic to account for that choice. If the choice is sequential, add the next task and that task only to activeElements.
If you’re not familiar with FEEL, let’s explain what you’re seeing here. This FEEL expression starts with the creation of a list called initialList. We then create another variable called appendedList by appending initialList with either the first task (if routingChoice is sequential) or the entire list (if routingChoice is parallel). We then pass back the contents of appendedList, as denoted by .appendedList on the last line, and populate `activeElements`.
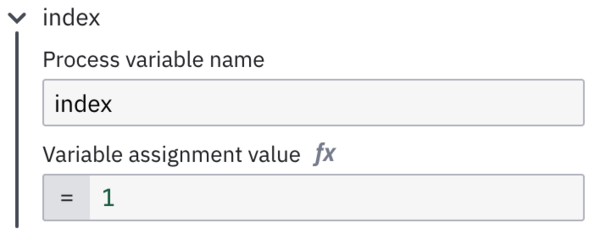
The index variable will be used to track where you are in the process. Set it to 1:
In tasksToExecute, you’ll hold all of the tasks, whether in sequence or in parallel, in a list which you can use to display where you are in a breadcrumb trail. Use the following expression:
{ "initialList": [],
  "appendedList": if routingChoice = "parallel" then insert before(initialList, 1, tasksToExecute) else tasksToExecute
}.appendedList
In a similar fashion to activeElements, create a list variable called initialList. Next, insert tasks as a nested list if routingChoice is parallel or the entire list if routingChoice is sequential.
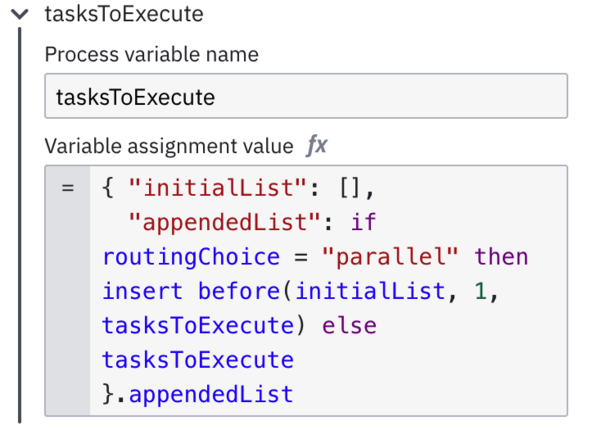
Your screen should look something like this:
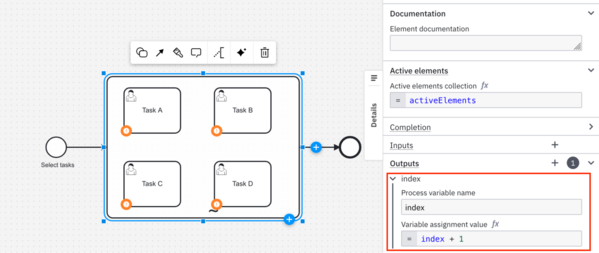
Now you need to increase the index after completion of the ad-hoc sub-process and add some logic to determine if you’re done. In the process diagram, put focus on the ad-hoc sub-process and add an Output called index. Then add an expression of index + 1. Your screen should look something like this:
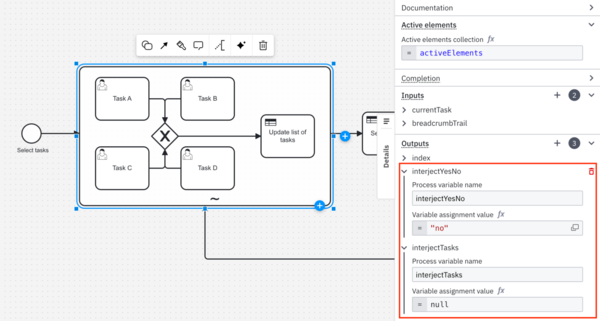
Add two more Outputs to the ad-hoc sub-process, interjectYesNo with a value of no and interjectTasks with a value of null. We’ll be using these values later in a form inside the subprocess and this will set those variables to default values upon the conclusion of a sub-process iteration:
Next, we’ll add a business rule task and a gateway to the process. Drag and drop a generic task from the palette on the left and change it to a Business rule task. Then drag and drop an Exclusive gateway from the palette after the Business rule task. You’ll probably need to move the End event to accommodate these items.
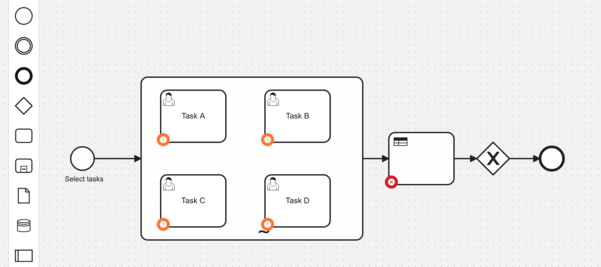
Your screen should look like this (you can see the palette on the left):
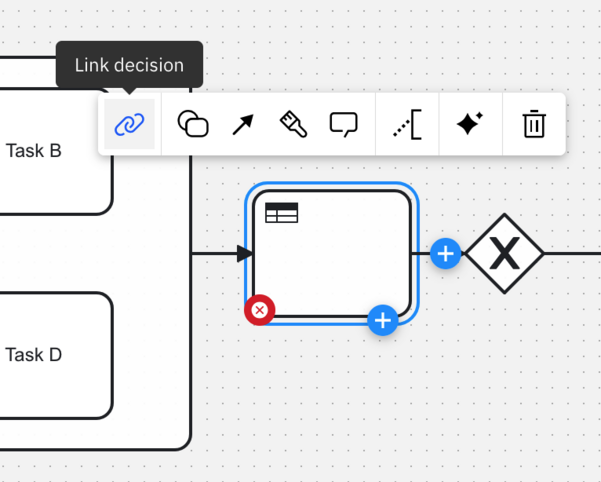
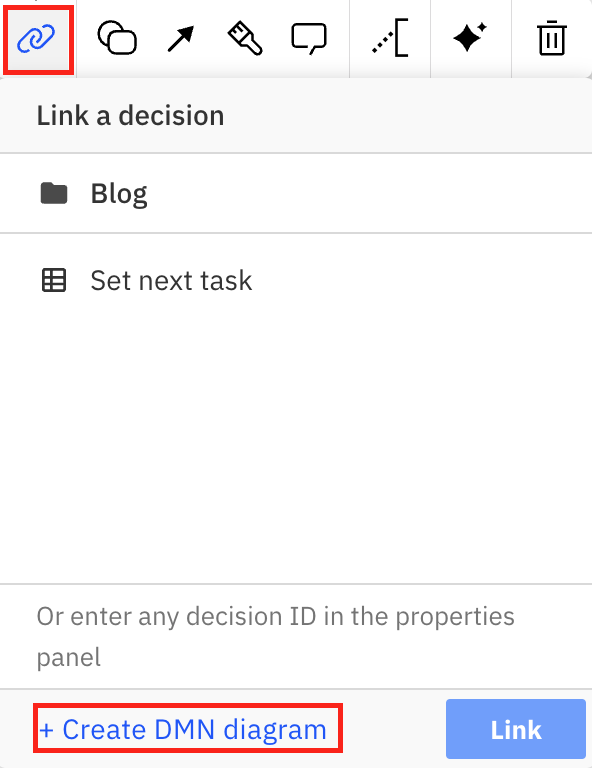
Let’s create a rule set. Put focus on the Business rule task and click the link icon in the context pad that appears.
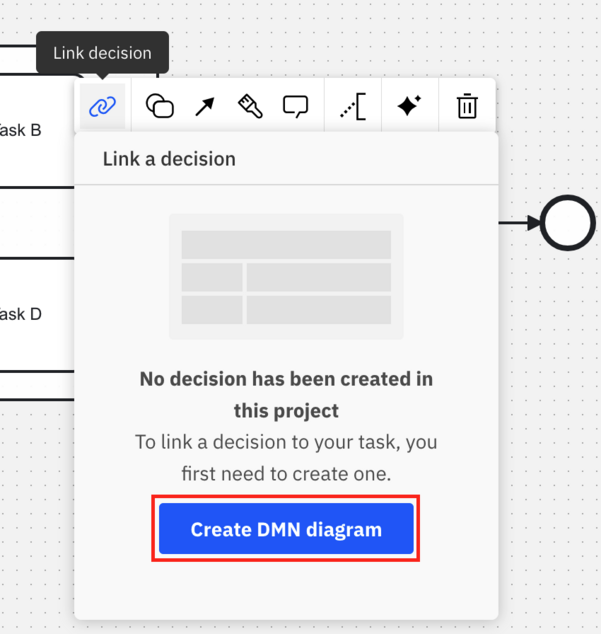
In the dialog box that appears, click Create DMN diagram.
In the decision requirements diagram (DRD) diagram that appears, set the Diagram and Decision names to Set next task.
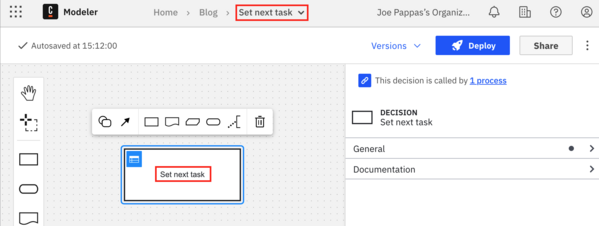
The names aren’t critical, but they should be descriptive.
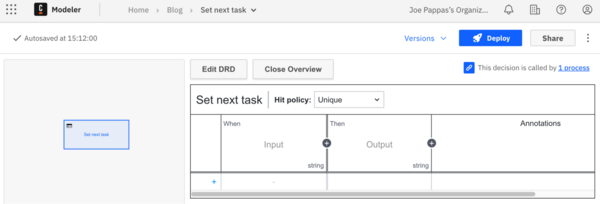
Let’s write some rules! Click the blue list icon in the upper left corner of the Set next task decision table to open the DMN editor.
In the DMN editor, you’ll see a split-screen view. On the left is the DRD diagram with the Set next task decision table. On the right is the DMN editor where you can add and edit rules.
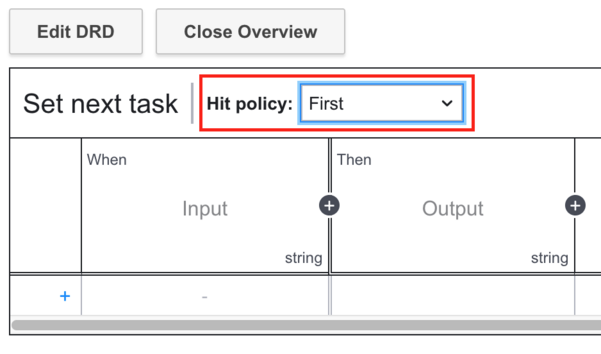
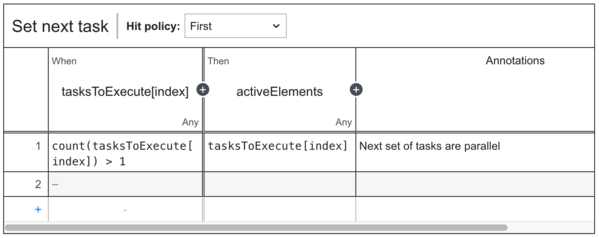
First things first, update the Hit policy to First to keep things simple. The DMN will execute until it hits the first rule that matches. Check out the documentation for more information regarding Hit Policy.
Let’s add some rules. In the DMN editor, you can add rule rows by clicking on the blue plus icon in the lower left. Add two rows to the decision table.
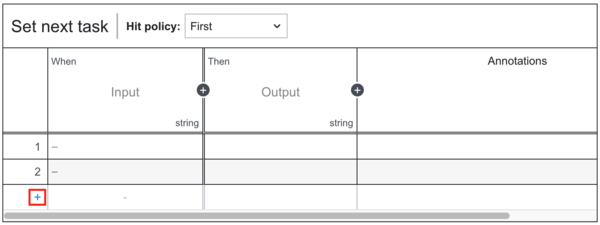
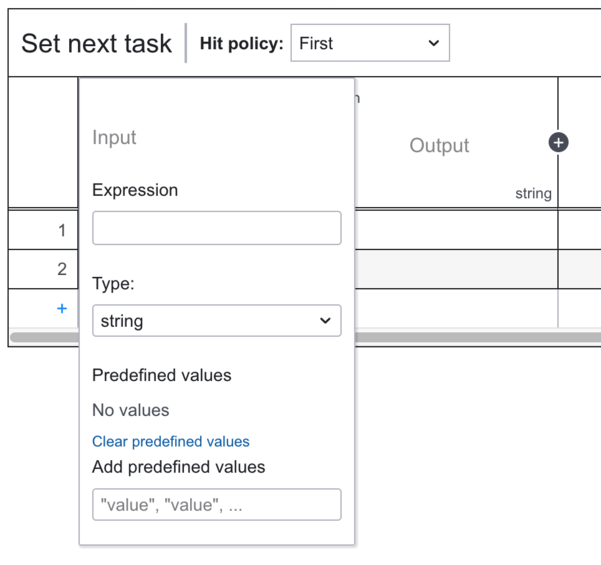
Next, double click Input to open the expression editor. Your screen should look something like this:
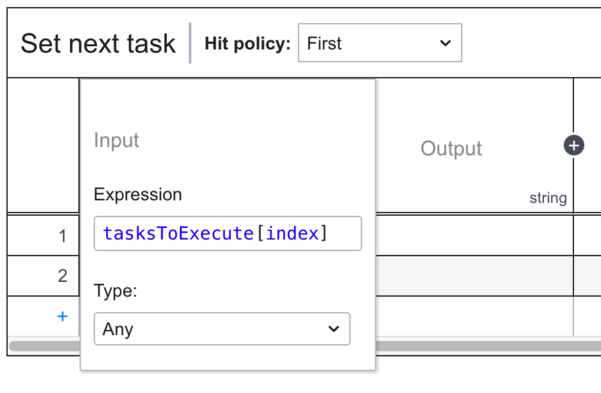
In this screen, enter the following expression: tasksToExecute[index]. Select Any for the Type. Your screen should look like this:
Just to recap, you’ve incremented the index by one. Here you retrieve the next task or tasks, and now you’ll write rules to determine what to do based on what is retrieved.
In the first row input, enter the following FEEL expression: count(tasksToExecute[index]) > 1.
This checks to see if the count of the tasksToExecute list at the new index is greater than one which indicates parallel tasks. For now it’s not important, but it will be later. Next, double-click Output to open the expression editor.
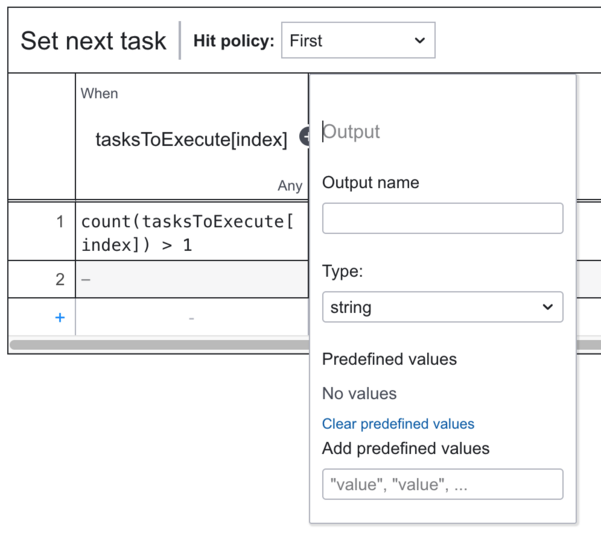
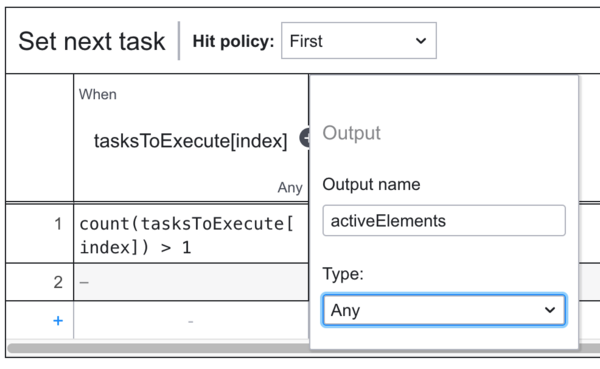
For Output name, enter activeElements, and for the Type, enter Any.
In the first rule row output, enter the expression tasksToExecute[index].
If the count is greater than one, this means that there are parallel tasks to be executed next. All that’s needed is to pass on these tasks. The expression above does just that. You may also want to put in an annotation to remind yourself of the logic.
For example, you can enter Next set of tasks are parallel for the annotation.
Your screen should look like this:
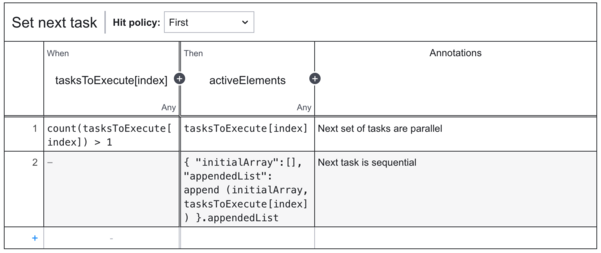
Next, add logic to the second row. Leave the otherwise notation - in for the input on the second row. Enter the following expression for the output of the second row:
{ "initialArray":[], "appendedList": append (initialArray, tasksToExecute[index]) }.appendedListWhat this does is create an empty list, add the next single task to be executed to the empty list, and then populate activeElements. You may want to add an annotation here as well: Next task is sequential.
Your screen should look like this:
Now you need to add logic to the gateway to either end the process or to loop back to the ad-hoc sub-process. Go back to the ad-hoc sub-process in your project.
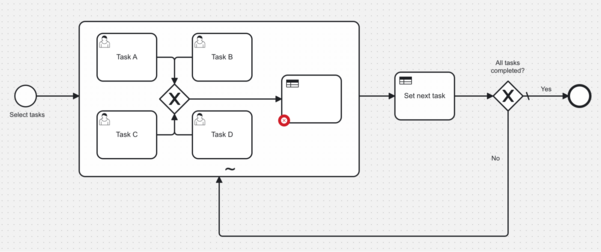
You might notice this in your process:
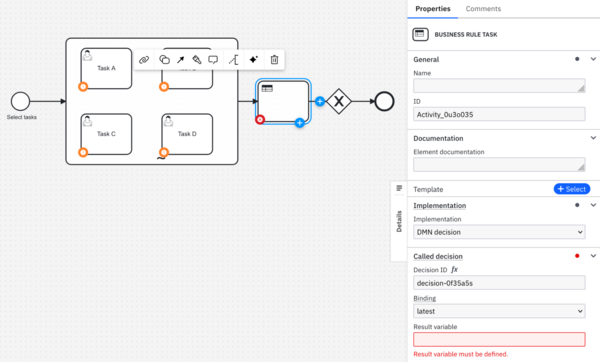
Add a Result variable of activeElements and add a name of Set next task. Your screen should look like this:
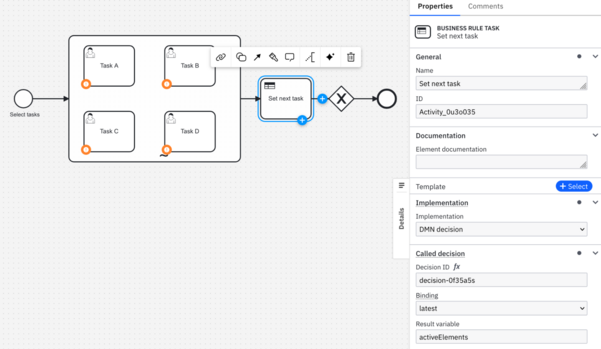
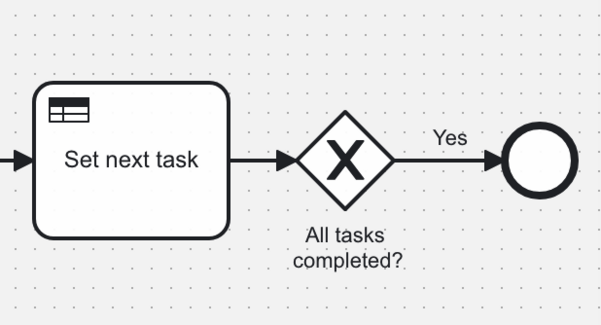
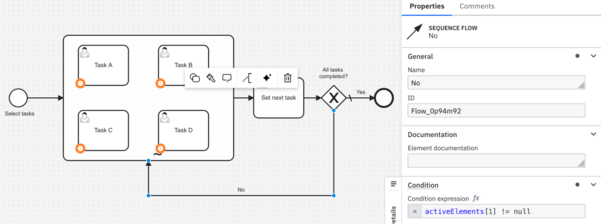
Add a name to the Exclusive gateway. Let’s use All tasks completed? Also, add the name Yes on the sequence flow from the gateway to the end event. Your screen should look like this:
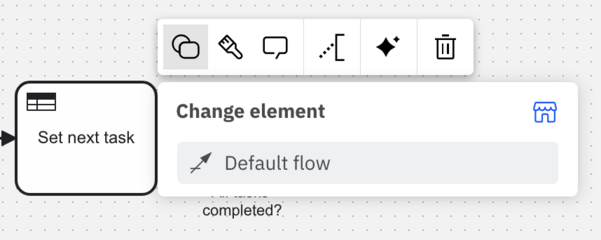
Change that sequence flow to a Default flow. Put focus on the sequence flow, click the Change element icon, and select Default flow.
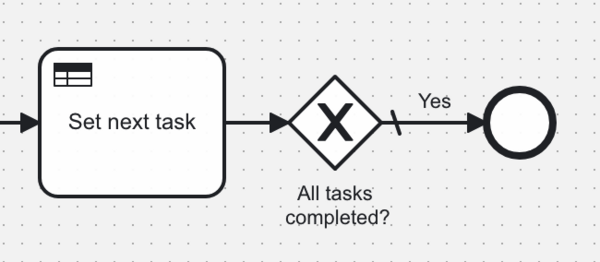
Notice the difference in the sequence flow now?
Next, add a sequence flow from the All tasks completed? gateway back to the ad-hoc sub-process. Put focus on the gateway and click the arrow icon in the context pad.
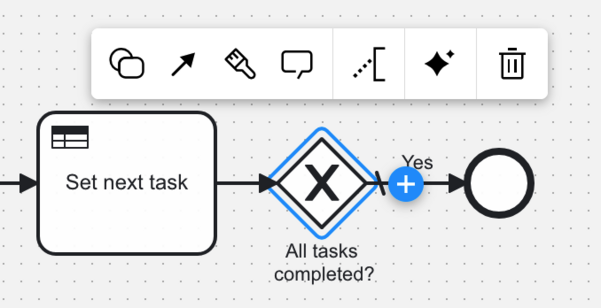
Draw the sequence flow back to the ad-hoc sub-process. You may need to adjust the sequence path for better clarity in the diagram.
Add the name No to the sequence flow. Add the following Condition expression: activeElements[1] != null.
Your screen should look like this:
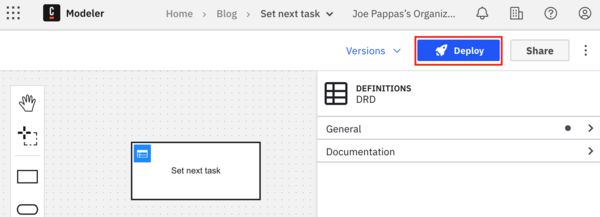
Before running this process again, you need to deploy the Set next task rule. Switch over to the Set next rule DMN and click Deploy.
One update is needed in the starting form. Open the Select tasks form and go to the Select tasks form element. Change the Key from activeElements to tasksToExecute.
If you recall, the outputs you defined in the Start event will add activeElements.
Go back to the ad-hoc sub-process diagram and click Run. This time, select Task A and Task B and leave the routing choice set to Sequential. Click Run.
In your Tasklist, you should only see Task A. Claim and complete the task. Wait for a moment, and you should then see Task B in Tasklist. Claim and complete the task.
Now, if you go to Operate and view the completed process instance, it should look something like this:
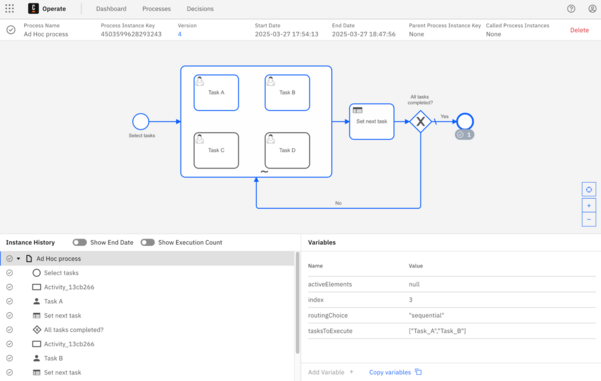
Start another ad-hoc sub-process but this time select a number of tasks and choose Parallel. Did you see the tasks execute in parallel? You should have!
In the next section, you’ll add a form to the tasks in the ad-hoc sub-process to allow users to add more parallel and sequential tasks during process execution. You’ll also add a breadcrumb trail to the form to provide users visibility into the tasks that have been completed and tasks that are yet to be completed.
Create a form to add more tasks and to include a breadcrumb trail for visibility
Go back to Web Modeler and make a duplicate of the start form. To do this, click the three-dot icon to the right of the form entry and click Duplicate.
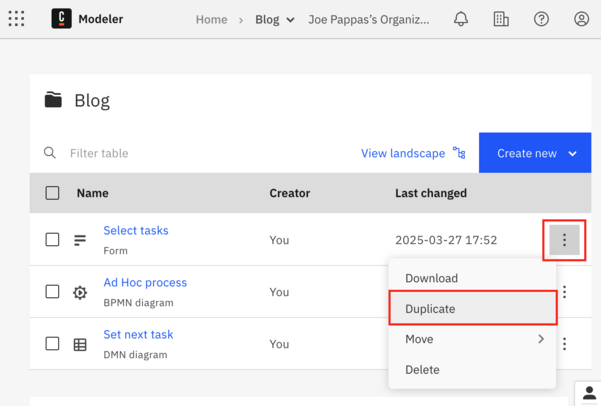
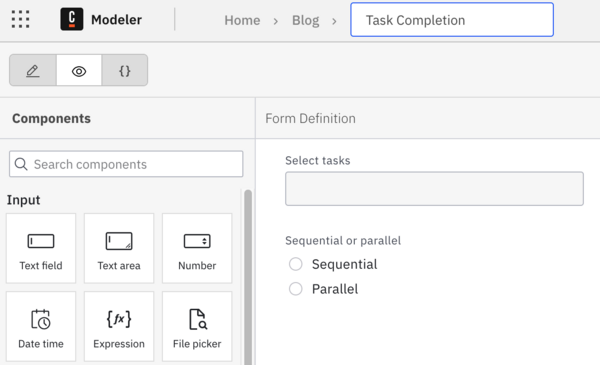
While you could use the same form for both the start of the process and task completion, it’ll be easier to make changes without being concerned about breaking other things in the short term. Name this duplicate Task completion.
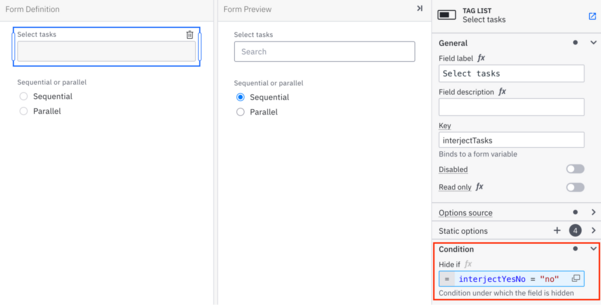
Click the Select tasks form element and change the Key to interjectTasks.
We’ll add logic later to add to the tasksToExecute variable.
Next, add a condition to the form elements to show or hide them based on a variable. You’ll add this variable, based on a radio button group, soon. In the Select tasks form element, open the Condition property and enter the expression interjectYesNo = “no”.
Your screen should look something like this:
Repeat the same for the Sequential or parallel form element:
You could just as easily put these elements into a container form element and set the condition property in the container instead, rather than setting the condition in each of the elements.
Next, add a Radio group to the form, above the Select tasks element. Set Field label to Interject any tasks?, Key to interjectYesNo, Static options to Yes and No with values of yes and no. Set Default value to No. Your screen should look like this:
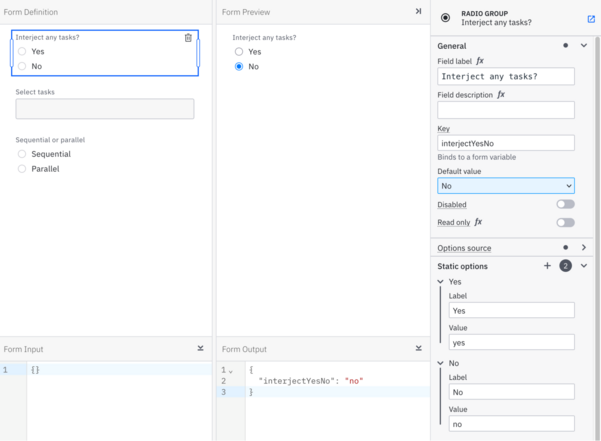
If you’ve done everything correctly, you should notice that the fields Select tasks and Sequential or parallel do not appear in the Form Preview pane. Given that No is selected in Interject any tasks?, this is the correct behavior. You should see both the Select tasks and Sequential or parallel fields if you select Yes in the Interject any tasks? radio group in Form Preview.
Next, you’ll add HTML to show a breadcrumb trail of tasks at the top of the form. Drag and drop an HTML view form element to the top of the form.
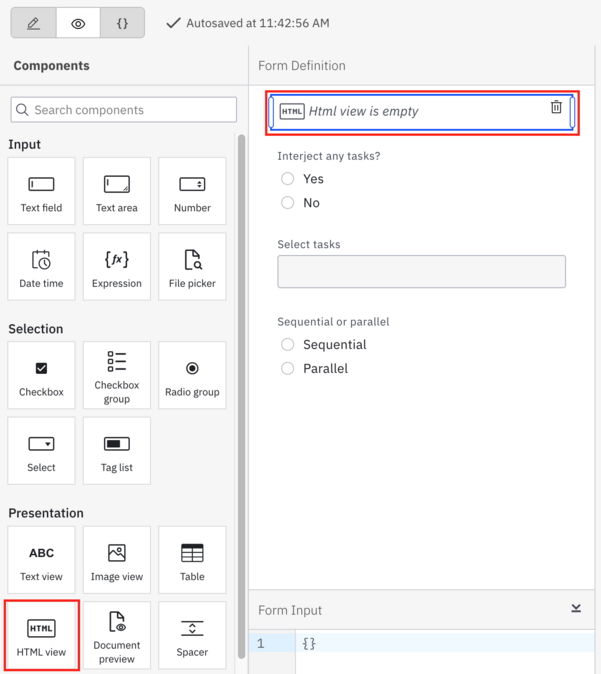
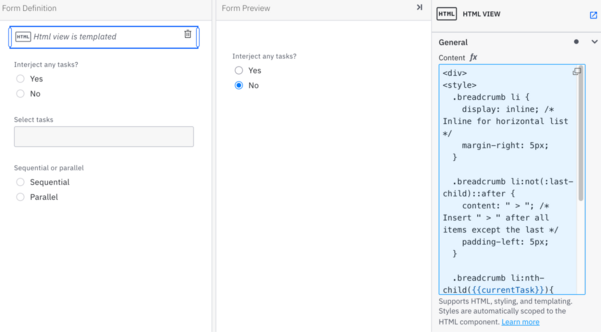
Copy and paste the following into the Content property of the HTML view:
<div>
<style>
  .breadcrumb li {
    display: inline; /* Inline for horizontal list */
    margin-right: 5px;
  }

  .breadcrumb li:not(:last-child)::after {
    content: " > "; /* Insert " > " after all items except the last */
    padding-left: 5px;
  }

  .breadcrumb li:nth-child({{currentTask}}){
    font-weight: bold; /* Bold the current task */
    color: green;
  }
</style>
<ul class="breadcrumb">
    {{#loop breadcrumbTrail}}
      <li>{{this}}</li>
    {{/loop}}
</div>
Essentially this creates a breadcrumb trail using an HTML unordered list along with some CSS styling. You’ll need to provide two inputs, currentTask and breadcrumbTrail, which we’ll define next.
Your screen should look something like this:
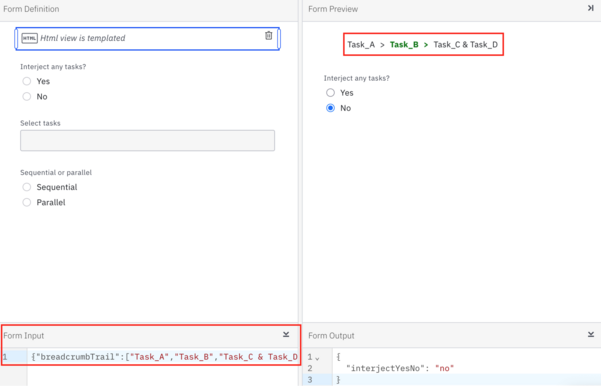
Let’s test the HTML view component. Copy and paste this into the Form Input pane:
{"breadcrumbTrail":["Task_A","Task_B","Task_C & Task_D"], "currentTask":2}Your screen should look something like this (note that Task B is highlighted):
Feel free to experiment with the CSS.
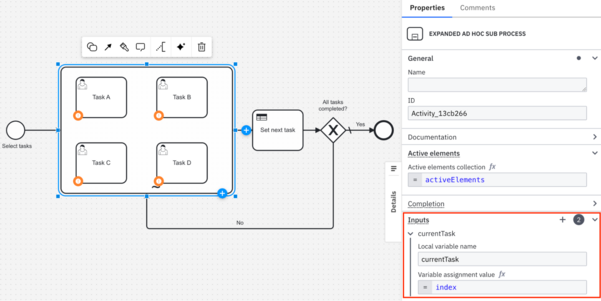
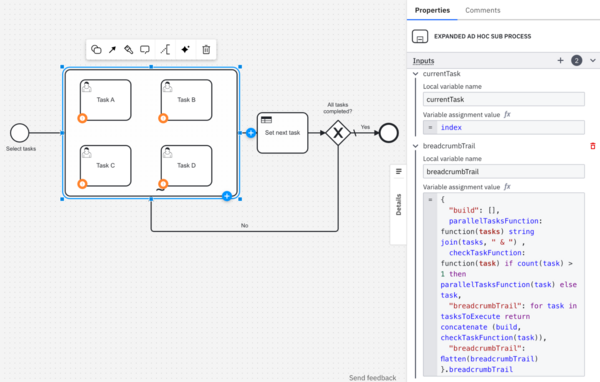
Go back to the ad-hoc sub-process diagram. You need to add inputs to the ad-hoc sub-process to feed this view. Be sure to put focus on the ad-hoc sub-process. Add an input called currentTask and set the value to index.
Next, add an input called breadcrumbTrail and enter the following expression:
{
  "build": [],
  parallelTasksFunction: function(tasks) string join(tasks, " & ") ,
  checkTaskFunction: function(task) if count(task) > 1 then parallelTasksFunction(task) else task,
  "breadcrumbTrail": for task in tasksToExecute return concatenate (build, checkTaskFunction(task)),
  "breadcrumbTrail": flatten(breadcrumbTrail)
}.breadcrumbTrail
This expression takes the tasksToExecute variable and creates an HTML-friendly unordered list. It creates an empty array, build[], then defines a couple of functions:
parallelTasksFunction, that takes the parallel tasks and joins them together into a single stringcheckTaskFunction, that sees if the list item is an array.
If the list item is an array, it calls the parallelTaskFunction. Otherwise it just returns the task. All the while, data is being added to the build[] list as defined in the loop in breadcrumbTrail. It is eventually flattened and returned for use by the HTML view to show the breadcrumb trail.
Your screen should look something like this:
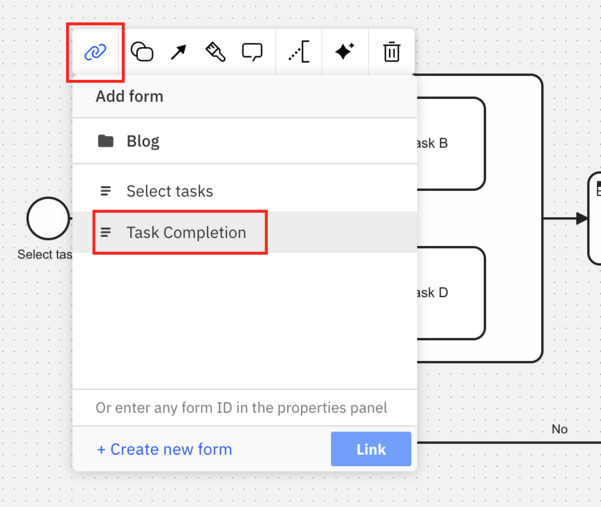
Next, link the four tasks in the ad-hoc sub-process to the Task Completion form.
One last thing you need to do is add a rule set in the ad-hoc sub-process. This will add tasks to the taskToExecute variables if users opt to add tasks as they complete tasks.
Add a Business rule task to the ad-hoc sub-process, add an exclusive gateway join, then add sequence flows from the tasks to the exclusive gateway join. Finally, add a sequence flow from the exclusive gateway join to the business rule task.
It might be easier to just view the next screenshot:
Every time a task completes, it will also invoke the rule that you’re about to author.
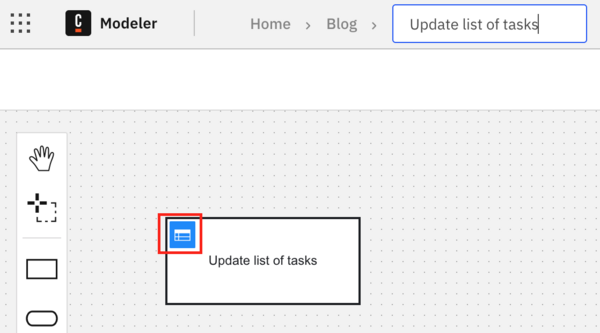
Click the Business rule task and give it the name Update list of tasks. Click the link icon in the context pad, then click Create DMN diagram.
You should see the DRD screen pop up. Click the blue list icon in the upper left corner of the Update list of tasks decision table.
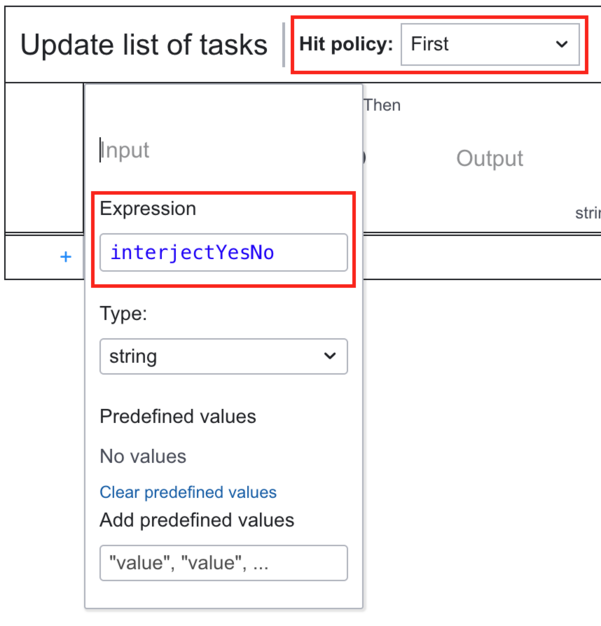
In the DMN editor, update the Hit Policy to First. Double-click Input and enter the following expression: interjectYesNo.
Optionally you can enter a label for the input, but we’ll leave it blank for now.
Add another input to the table by clicking the plus sign button next to interjectYesNo.
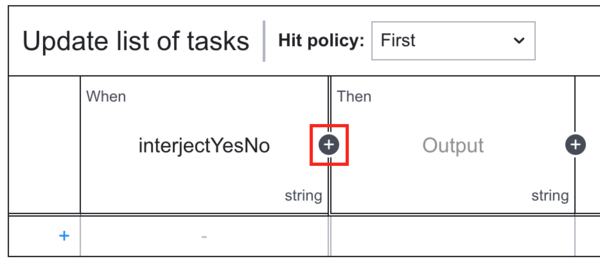
Once again double-click the second Input to open the expression editor and enter the following expression: routingChoice.
Double click Output to open the expression editor and enter the following: tasksToExecute.
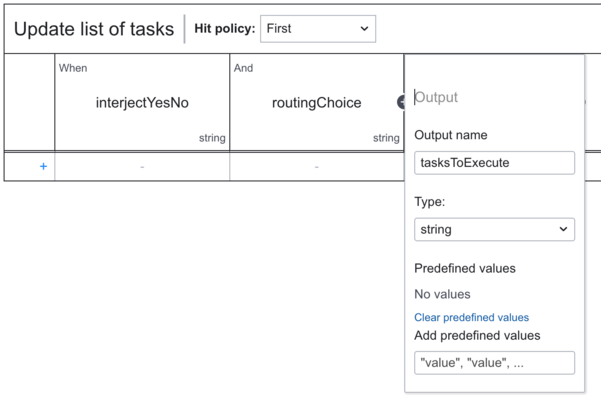
Just to recap—you’ll use the variables interjectYesNo and routingChoice from the form to determine what to do with tasksToExecute.
Let’s add the rules. Here is the matrix of rules if you don’t want to enter them manually:
| injectYesNo | routingChoice | tasksToExecute |
"no" | – | tasksToExecute |
"yes" | "sequential" | concatenate(tasksToExecute, interjectTasks) |
"yes" | "parallel" | if count(interjectTasks) > 1 then append(tasksToExecute, interjectTasks) else concatenate(tasksToExecute, interjectTasks) |
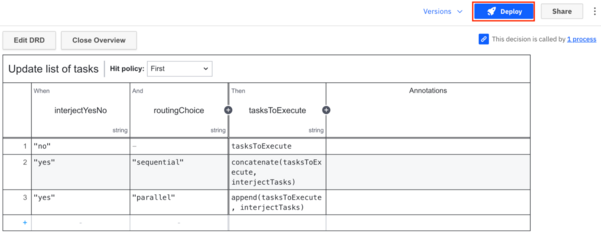
Your screen should look something like this:
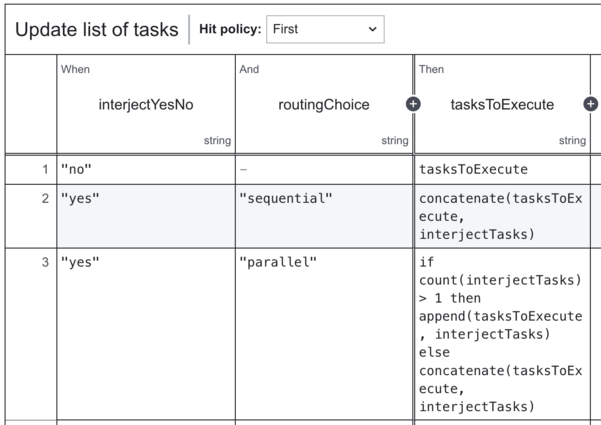
There are some differences between concatenate and append in FEEL in this context. The behavior of concatenate in this context will add the tasks as individual elements into the tasksToExecute list. Since the second argument of append takes Any object, it will add the entire object. In this case, it’s a list that needs to be added in its entirety to tasksToExecute. It’s a subtle but important distinction.
You’ll need an additional check of the count of interjectTasks in row 3 of the Output, in the event the user selects Parallel but only selects one task. In that case, it’s treated like a sequential addition.
Don’t forget to click Deploy as the rule will not be automatically deployed to the server upon the execution of the process.
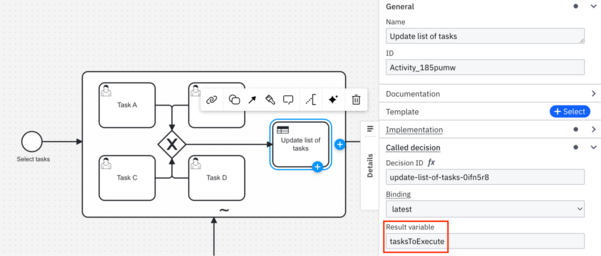
Go back to ad-hoc sub-process and add the Result variable tasksToExecute.
Run the process!
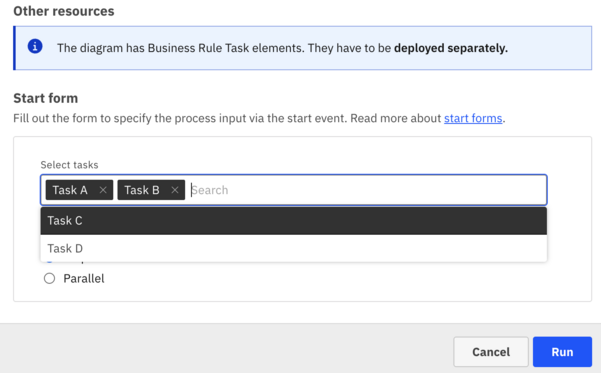
The moment of truth has arrived! Be sure to select the cluster you’ve created for running the process. Select Task A and Task B in the form. The form will default to a routing choice of sequential. Click Run. You should be presented with the start screen upon running the process.
Check Operate, and your process instance should look something like this:
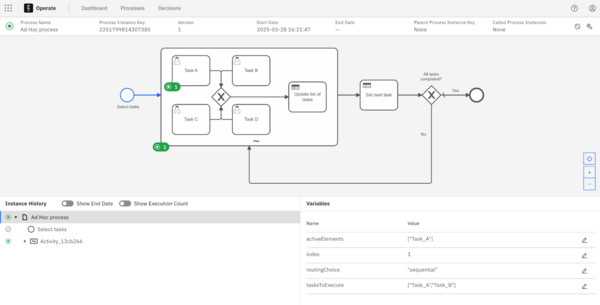
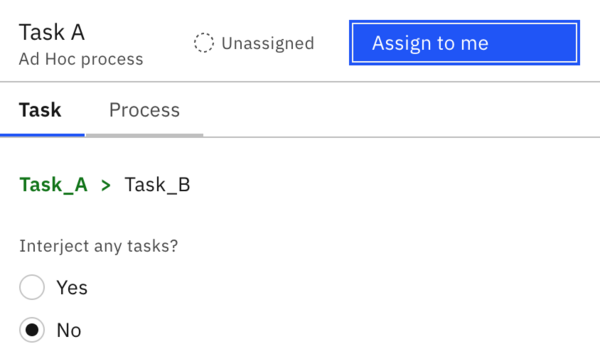
Now check Tasklist and open Task A. It should look something like this:
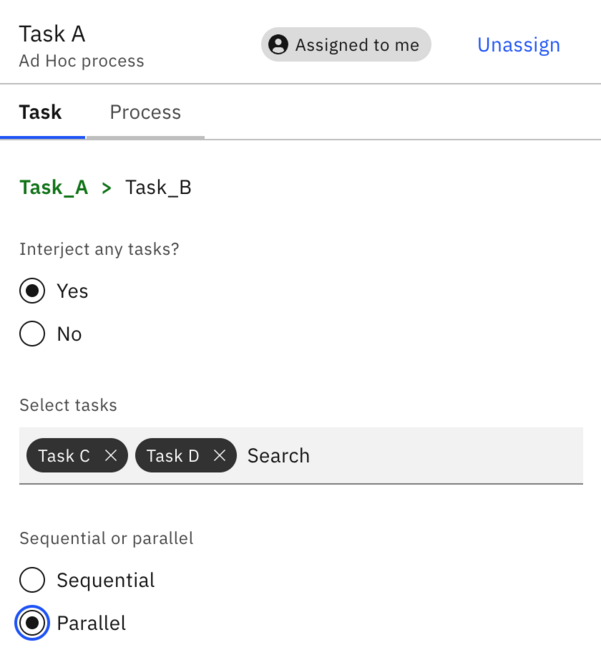
Click Assign to me to assign yourself the task. Select Yes to interject tasks. Next, select Task C and Task D and Parallel.
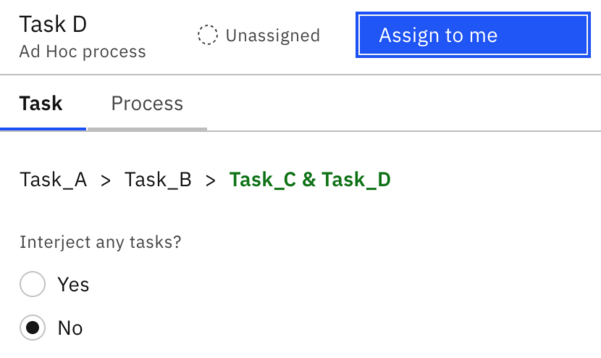
Complete the task. You should see Task B appear in Tasklist. Select it and notice how Task C and Task D have been added in parallel to be executed after Task B.
Also note the current task highlighted in green. Assign yourself the task and complete it.

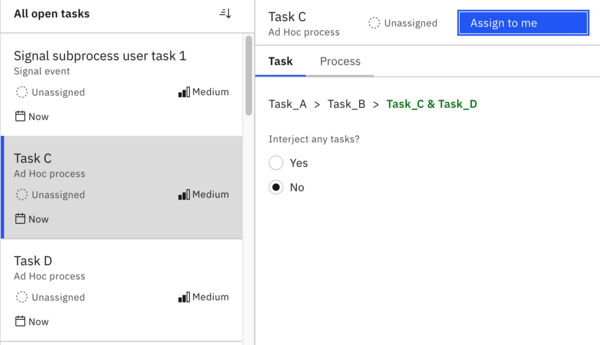
You should now see Task C and Task D in Tasklist.
Assign yourself Task C, interject Task A sequentially, and complete the task. You may need to clear out previous selections.

Complete Task D without adding any more tasks. You’ll notice that Task A has not been picked up yet in the breadcrumb trail.
Task A should appear in Tasklist:
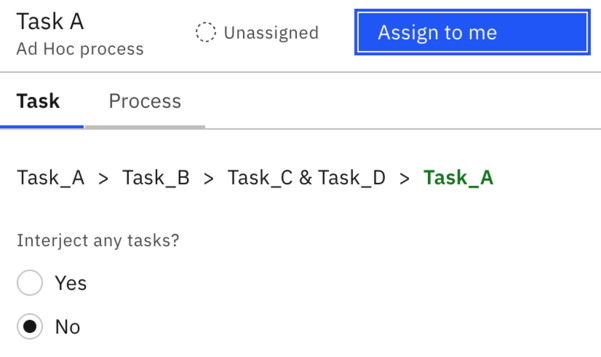
Notice the breadcrumb trail updates. Assign it to yourself and complete the task. Check Operate to ensure that the process has been completed.
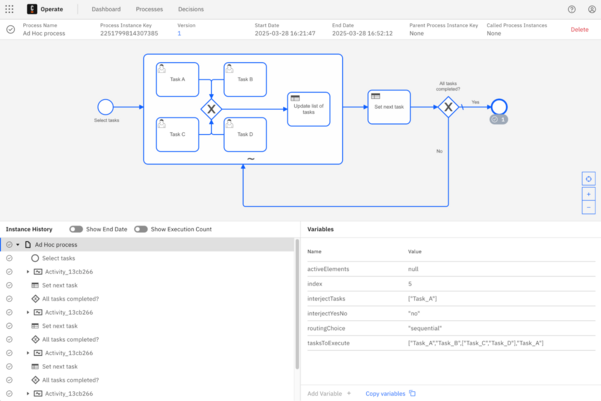
You can view the complete execution of the process in Instance History in the lower left pane.
You’ve built your ad-hoc sub-process!
Congratulations on completing the build and taking advantage of the power of ad-hoc sub-processes! Keep in mind that you can replace yourself in deciding which tasks to add, if any, by using rules, microservices, or even artificial intelligence.
Want to start working with AI agents in your ad-hoc sub-processes right now? Check out this guide for how to build an AI agent with Camunda.
Stay tuned for even more on how to make the most of this exciting new capability.
Start the discussion at forum.camunda.io